Are your chickens laying eggs in random corners of the coop, or worse, abandoning them outdoors?
The solution might be simpler than you think. Building your own nesting house doesn’t require advanced carpentry skills or expensive materials, just a bit of creativity and the right guidance.
In this, we’ll walk you through multiple building techniques, from basic designs perfect for beginners to more.
Ready to make your coop? Let’s see the essential steps for crafting the perfect nesting space your hens will actually want to use.
What are Nesting Boxes?
Nesting boxes, also known as nesting houses, are enclosed spaces where hens lay their eggs safely and comfortably.
A well-built nesting box provides privacy, warmth, and protection, encouraging chickens to lay consistently in one spot.
Most backyard farmers prefer DIY chicken nesting boxes because they’re affordable, customizable, and easy to build using simple materials like plywood.
These boxes are typically lined with straw, shavings, or nesting pads to keep eggs clean and cushioned.
Whether you’re raising a small flock or running a large coop, adding a sturdy nesting house ensures your hens feel secure and productive.
Tools and Materials Required for DIY Nesting Boxes
| Tools | Materials |
|---|---|
| Circular saw or handsaw | 1 sheet of 4×8 ft plywood |
| Measuring tape | Screws (1.5–2 inch) |
| Drill + drill bits | Corner clamps (90° angle) |
| Screwdriver | Wood glue (optional) |
| Straight edge & clamps | Nesting pads or straw |
| Protective eyewear | 3-inch wood strip (lip) |
| Pencil & square | 4-foot wooden dowel (roost bar) |
Step-by-Step Guide on How to Build a Nesting Box
This step-by-step will walk you through the entire process of crafting practical nesting boxes from start to finish, ensuring precision, comfort, and long-lasting results.
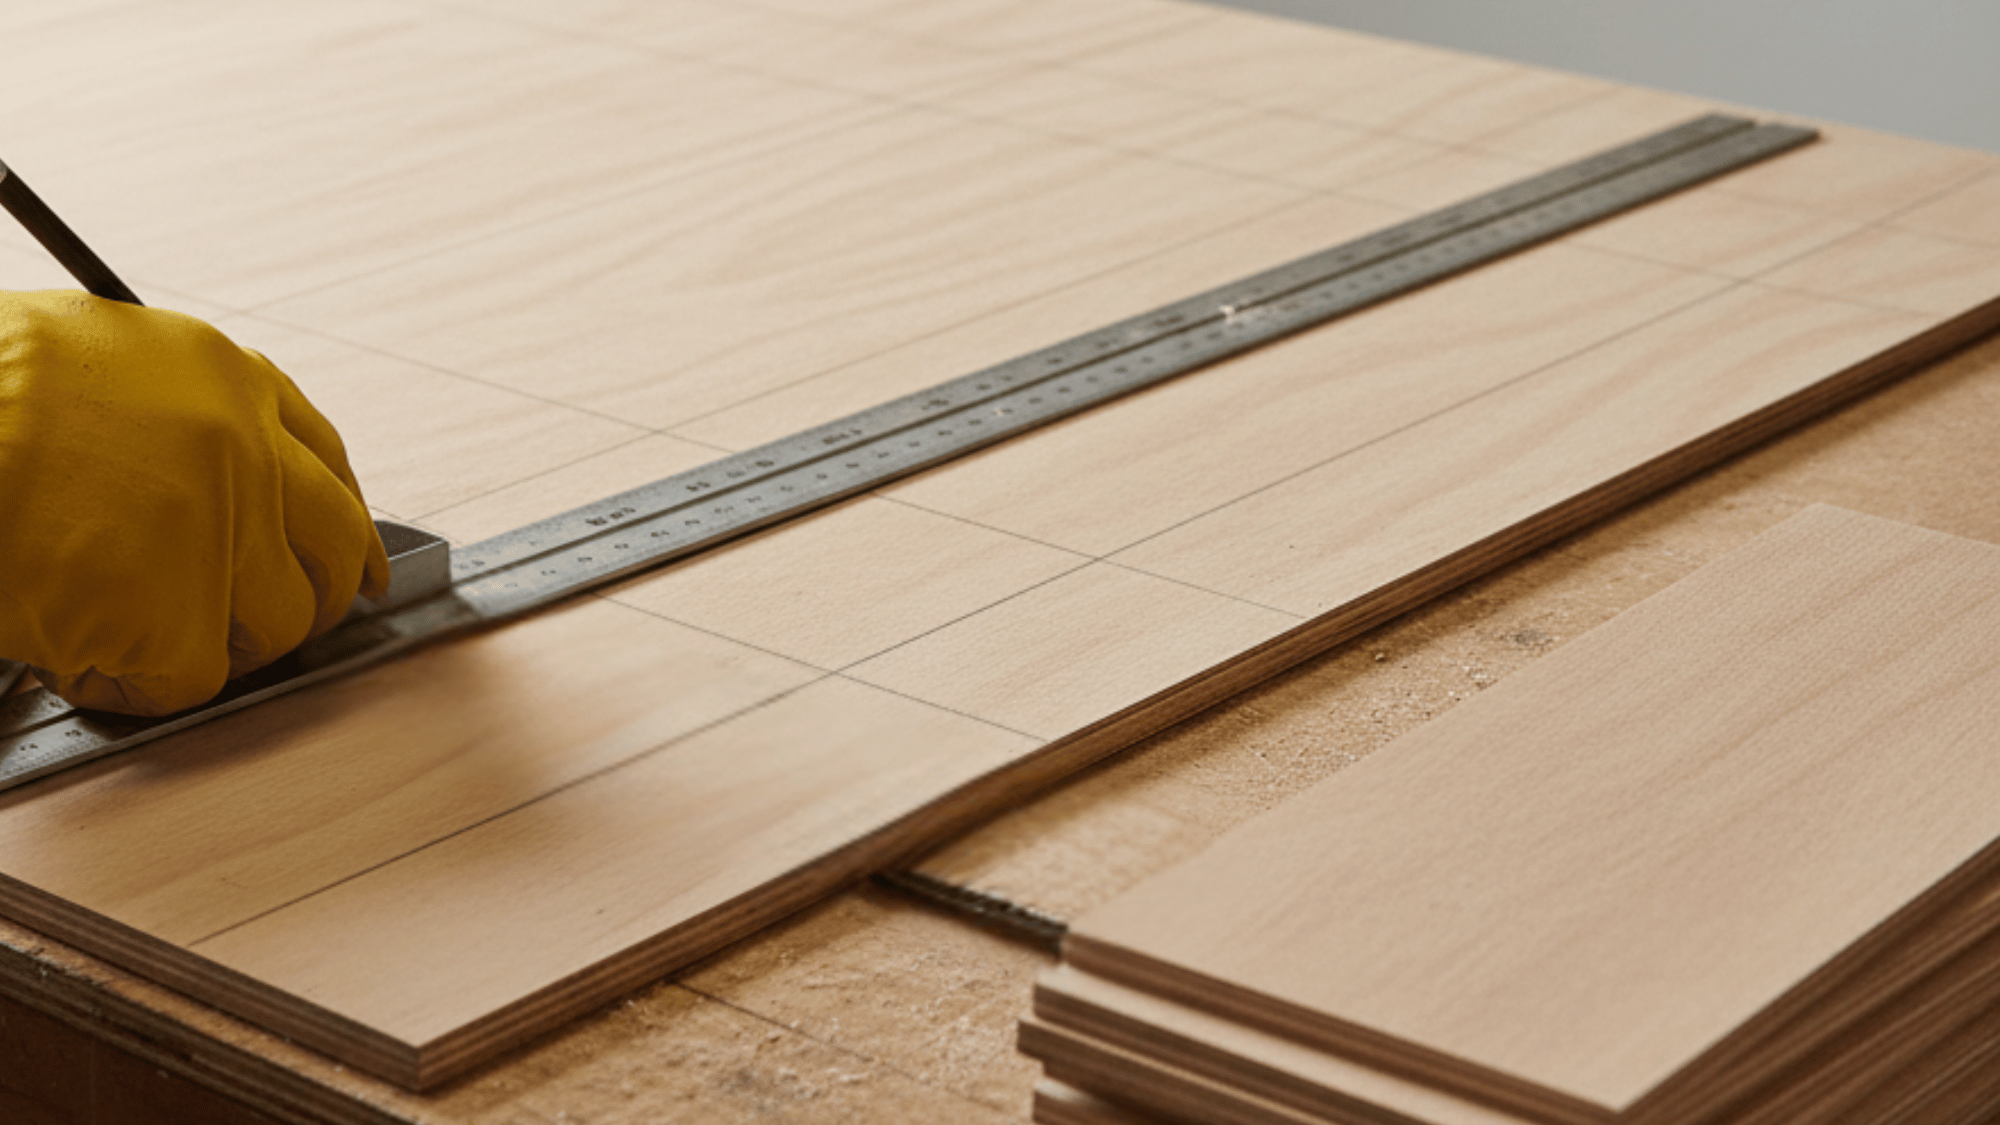
Step 1: Prepare and Cut Your Plywood Panels

Begin by selecting quality 3/4-inch plywood that’s sturdy and weather-resistant. Measure and mark panels for the back, sides, and bottom of your nesting box structure.
Use a circular saw or table saw to cut precisely along marked lines. Sand all edges thoroughly to remove splinters that could injure your chickens.
Organize cut pieces by labeling them to simplify assembly later. Accurate cuts during this initial stage ensure proper fit and stability throughout construction.
Step 2: Measure and Cut the Dividers
Calculate divider placement to create 12×12 inch individual nesting compartments, the ideal size for standard chicken breeds.
Cut divider panels from your plywood, ensuring they’re tall enough to provide privacy between boxes, typically 12-15 inches high. Sand divider edges are smooth to prevent injury.
Consider your flock size when determining how many compartments to include; one box per 3-4 hens is recommended. Properly sized compartments encourage hens to use boxes consistently while preventing overcrowding.
Step 3: Assemble the Frame
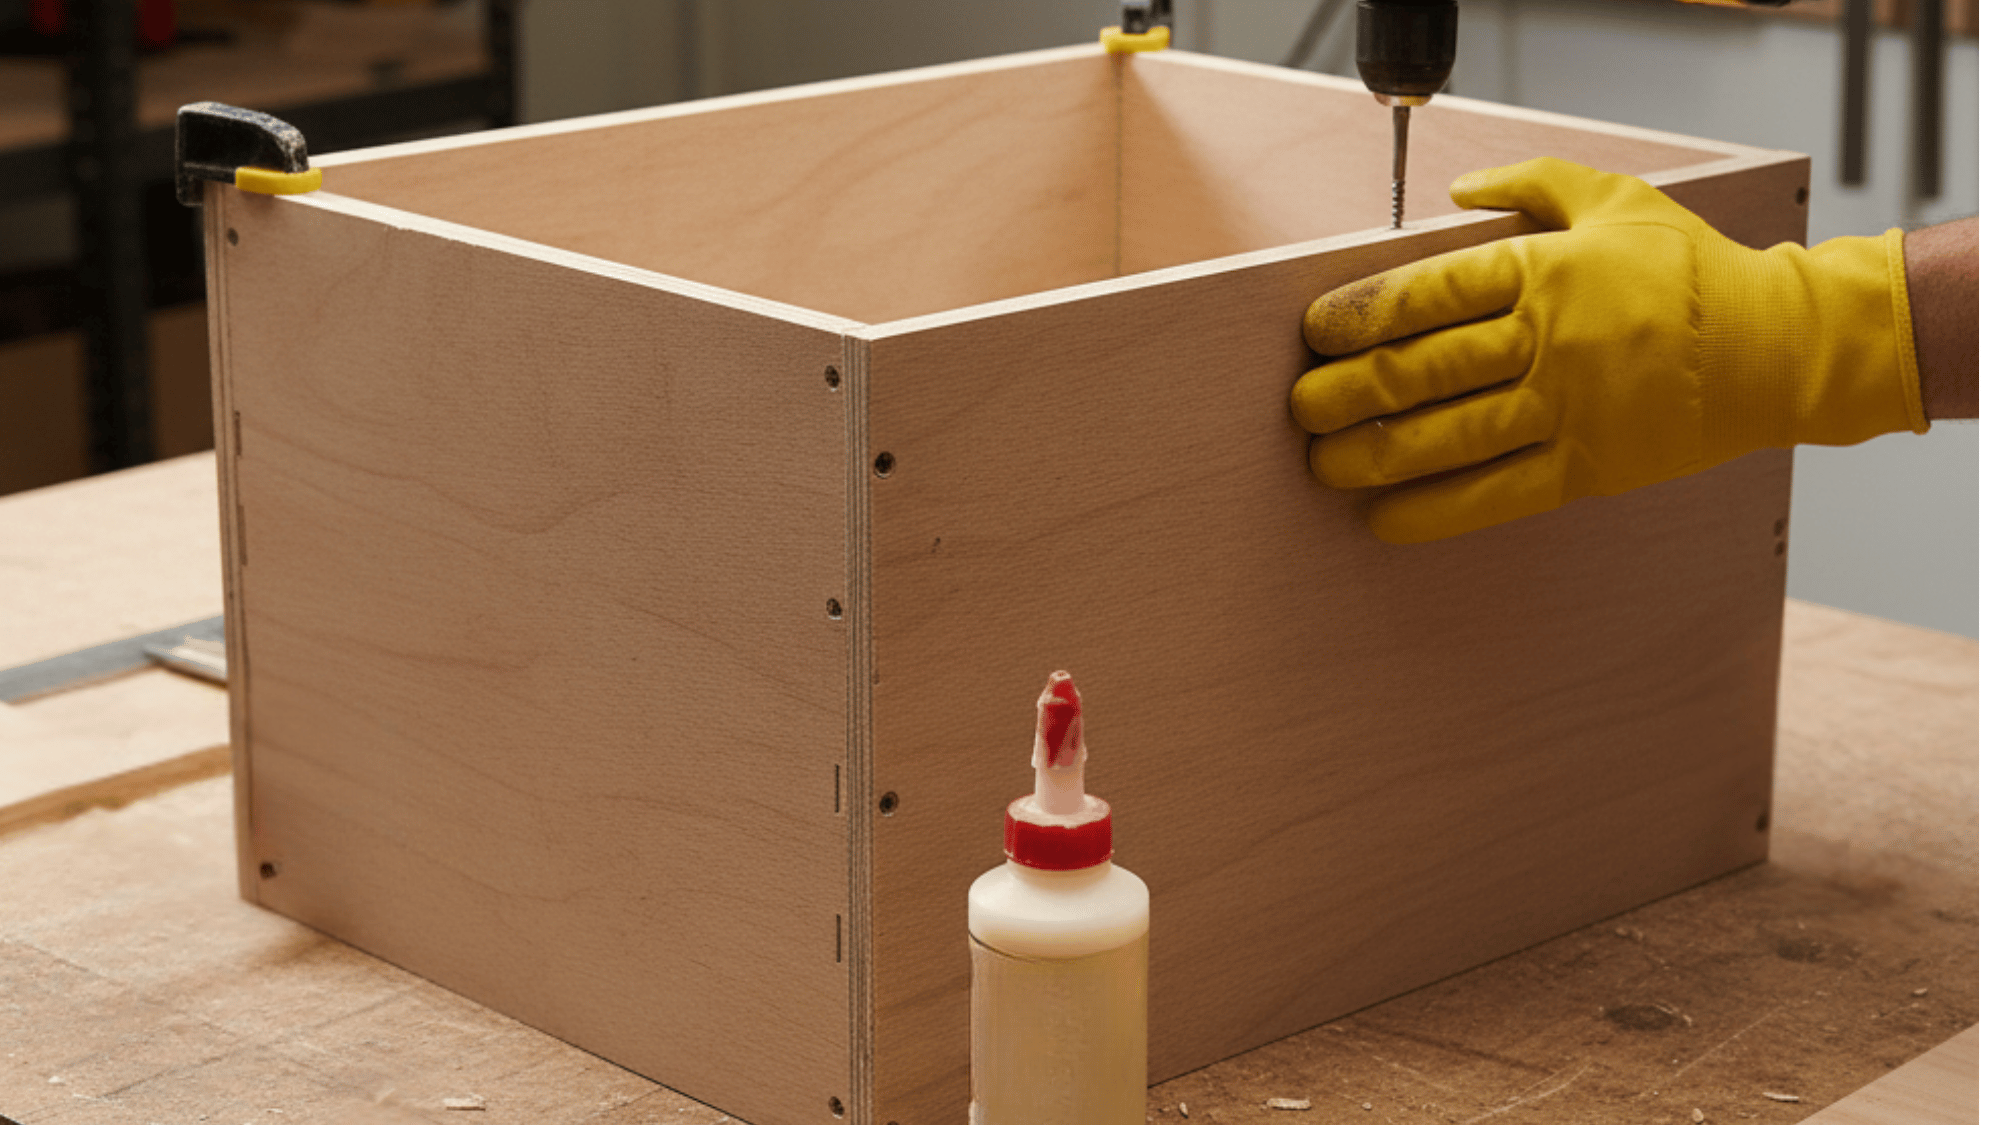
Apply wood glue along edges where panels meet, then secure the back panel to the side pieces. Attach the bottom panel, ensuring it’s perfectly square by measuring diagonals; they should match exactly.
Pre-drill screw holes to prevent wood splitting. Use a carpenter’s square to verify 90-degree angles at all corners.
Allow glue to dry for at least one hour before proceeding. A solid, square frame provides the essential foundation for durable nesting boxes.
Step 4: Add the Top Panel
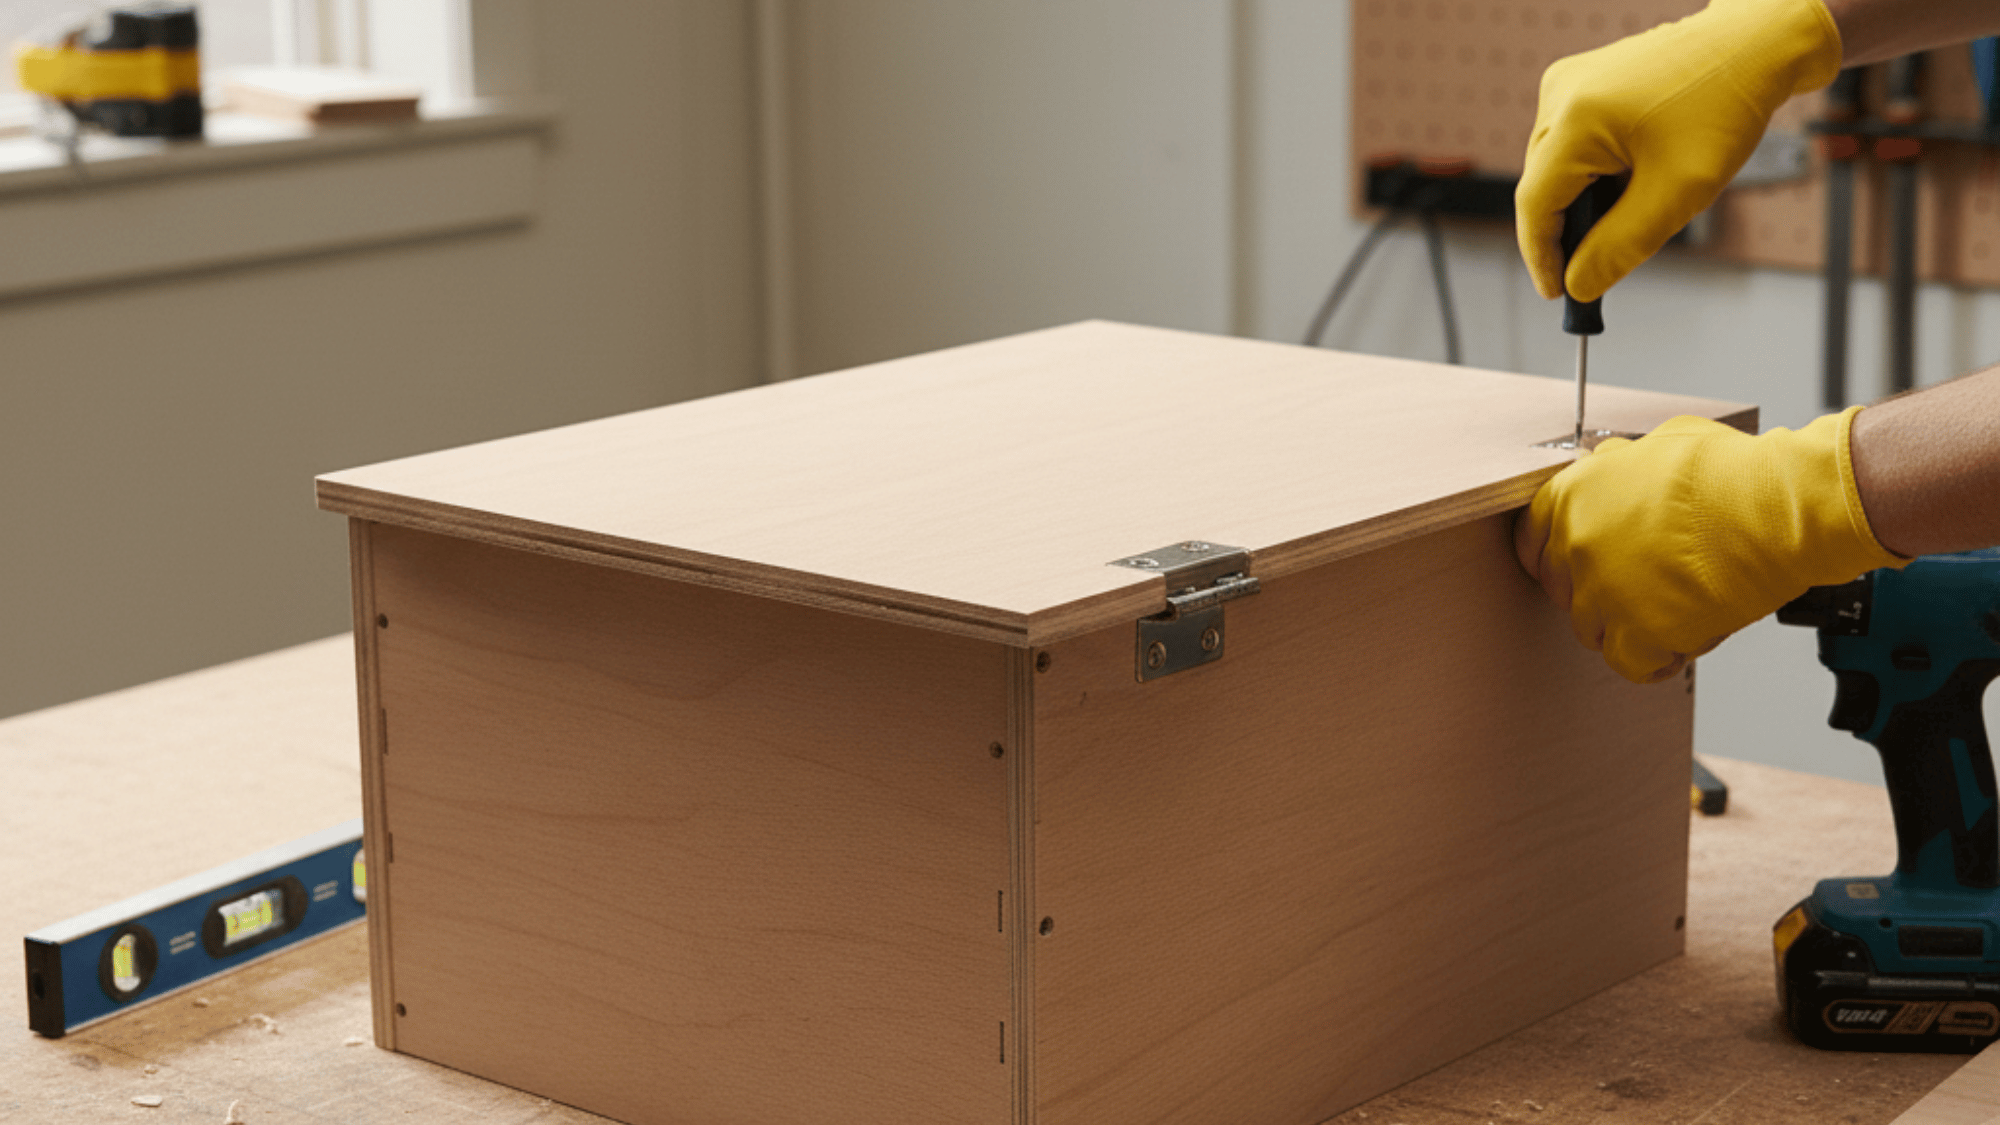
Cut the top panel slightly larger than the box dimensions to create a small overhang that sheds water away from interior spaces. Attach using hinges along the back edge, allowing easy access for egg collection and cleaning.
Ensure the lid slopes slightly forward about 45 degrees to discourage chickens from roosting on top, which creates unsanitary conditions.
A hinged top simplifies daily maintenance while protecting eggs from the weather. Consider adding a prop stick for convenient one-handed operation.
Step 5: Install the Dividers
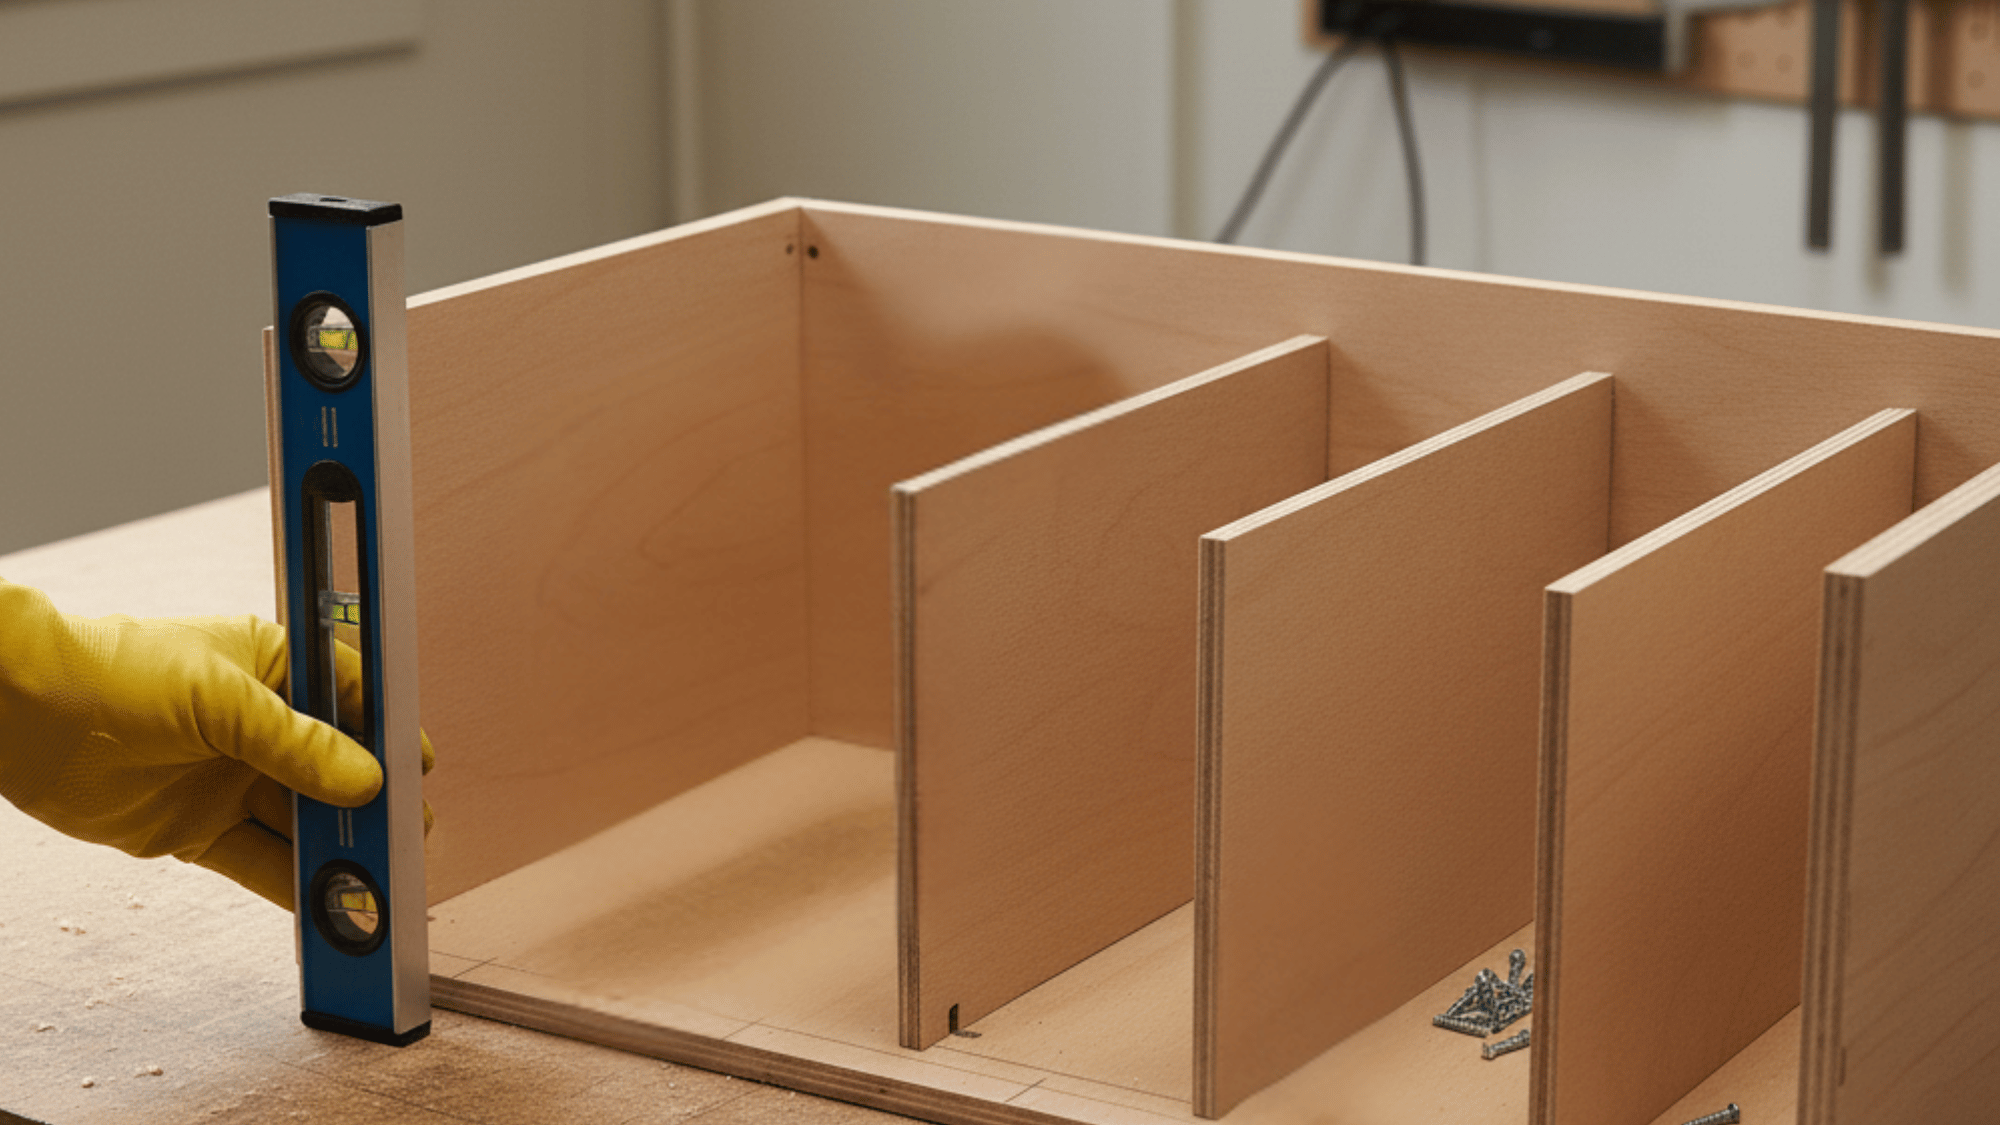
Mark divider positions inside the assembled frame at regular 12-inch intervals using a pencil and square.
Apply wood glue to divider edges, then position vertically between top and bottom panels. Secure each divider with screws driven through the bottom and angled through sides.
Ensure dividers stand perfectly vertical using a level before fastening permanently.
These partitions create individual compartments that give hens privacy and security, encouraging consistent egg-laying in designated spaces rather than random locations.
Step 6: Add the Front Lip and Roost Bar
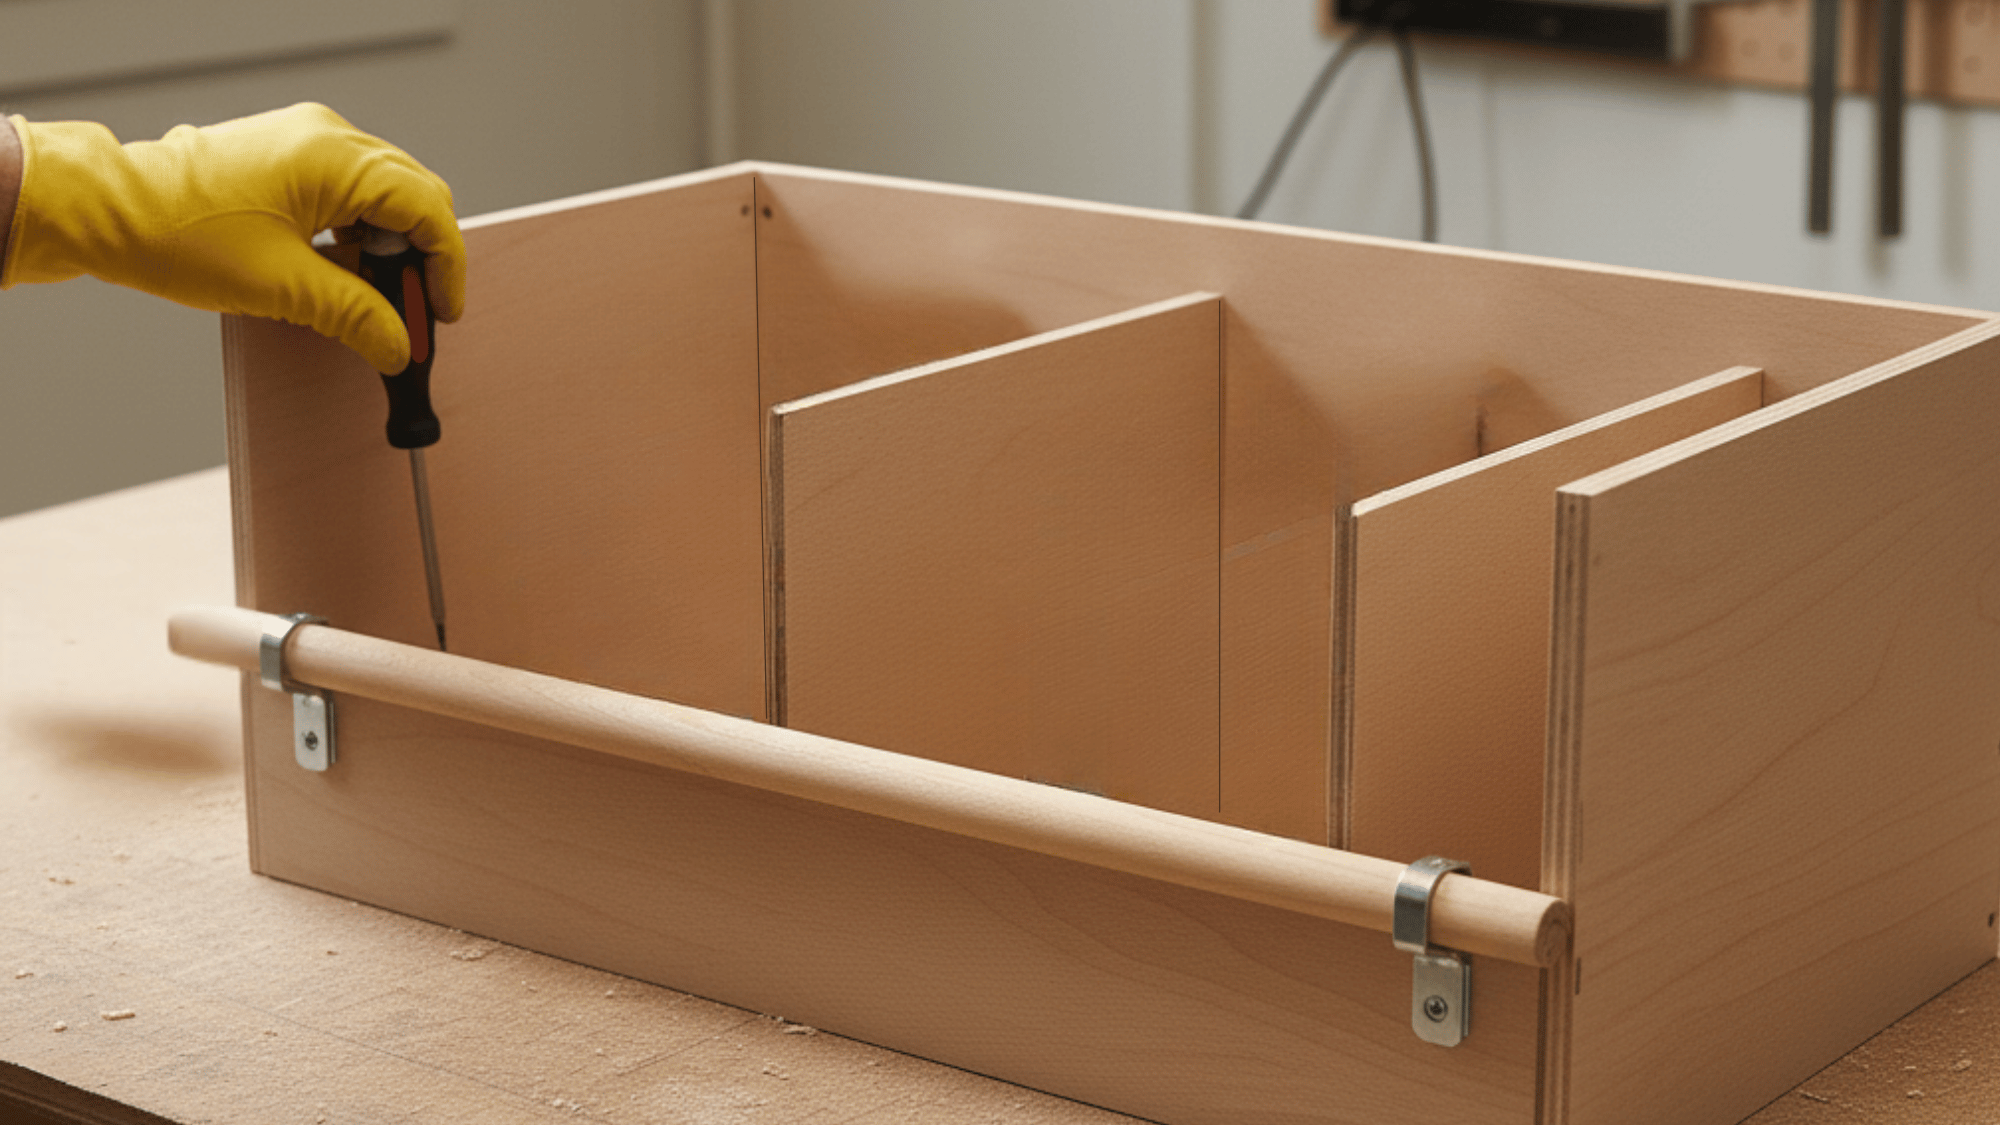
Install a 4-inch high front lip across the bottom opening to contain bedding material while allowing easy hen access.
Secure this board firmly with screws from inside the box. Attach a 2-inch diameter roost bar approximately 4-6 inches in front of nesting box entrances. This perch allows hens to pause before entering, providing a comfortable landing spot.
The front lip prevents eggs from rolling out, while the roost bar facilitates natural entry behavior patterns that chickens instinctively prefer.
Step 7: Finishing Touches and Bedding
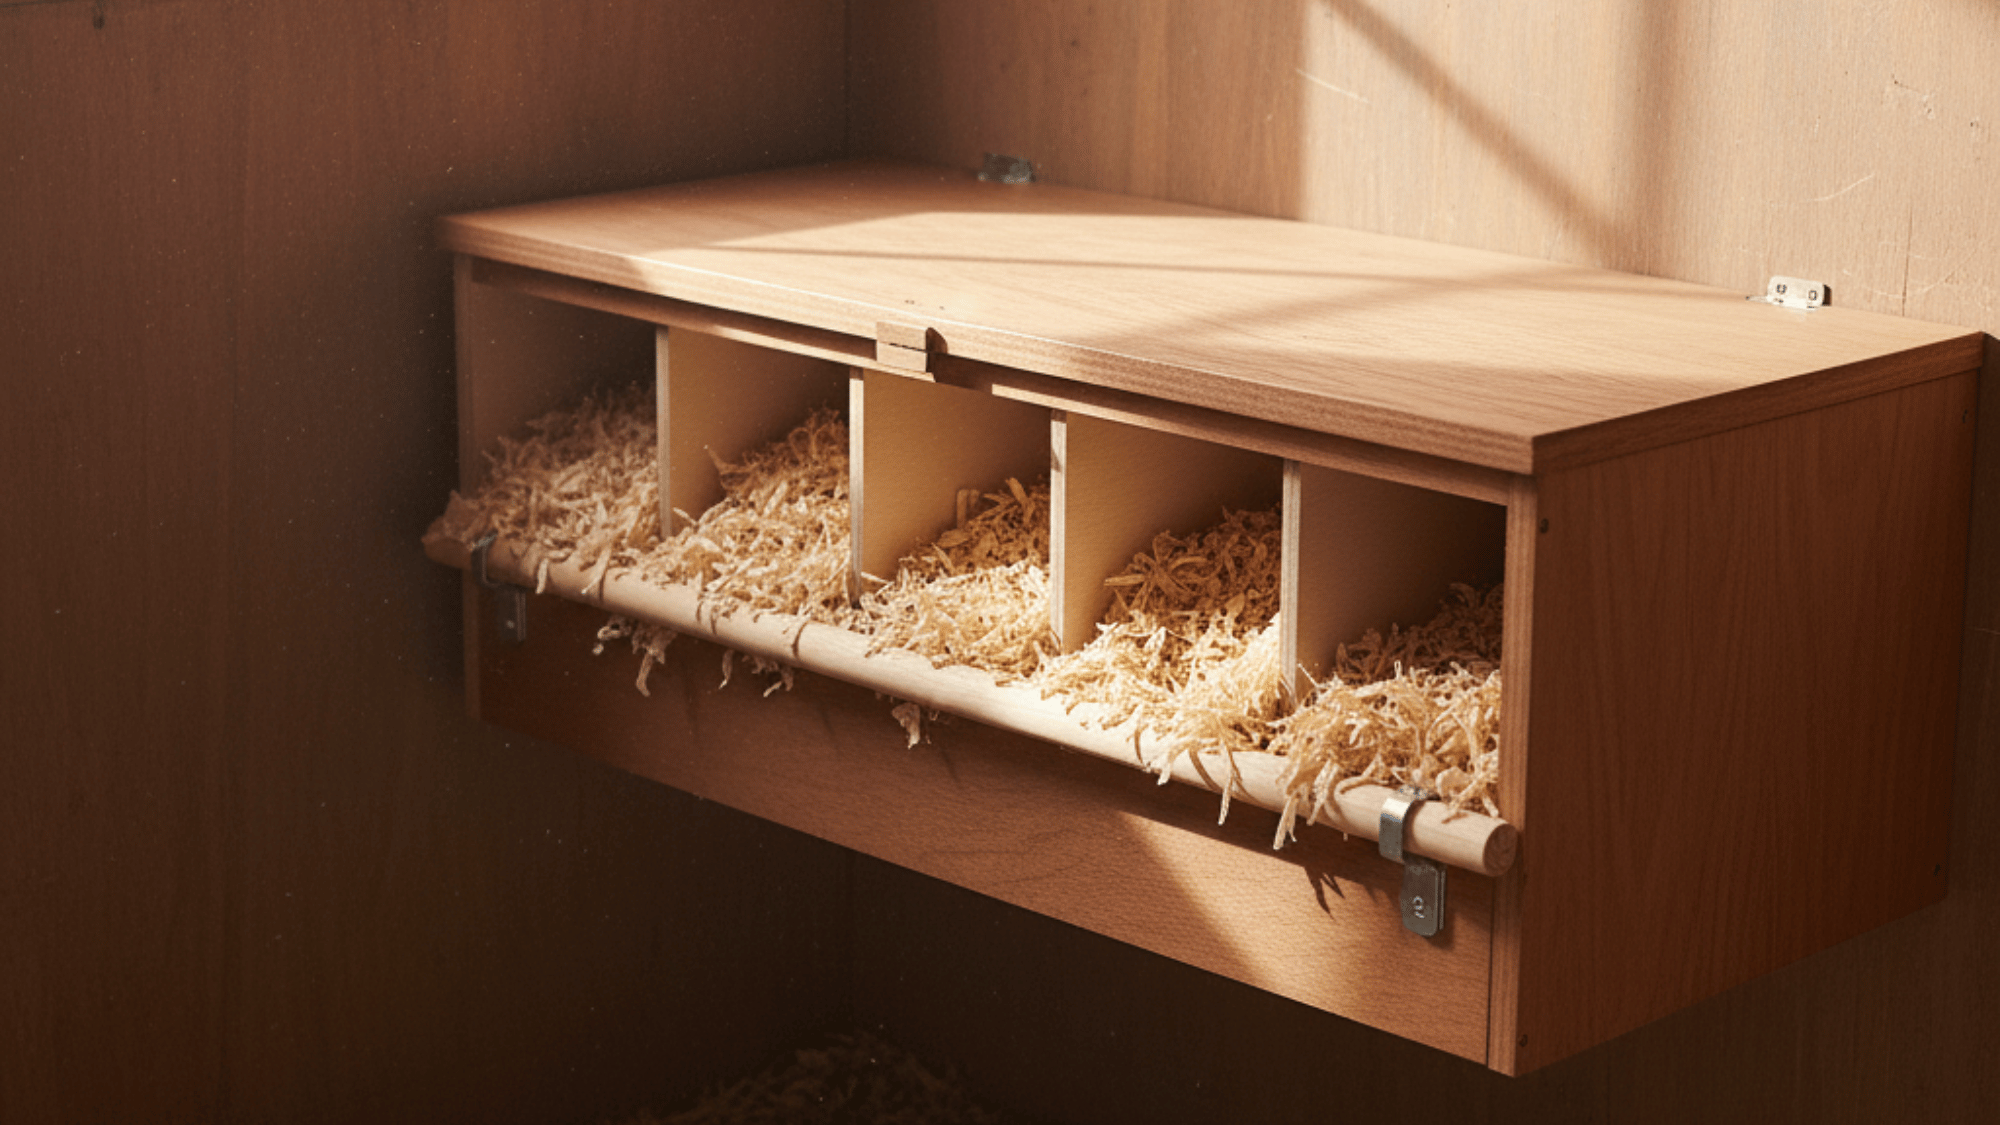
Apply exterior-grade wood stain or paint to protect plywood from moisture and extend the nesting box’s lifespan. Ensure all products are non-toxic and chicken-safe once fully cured.
Fill each compartment with 3-4 inches of soft, clean bedding material like pine shavings, straw, or aspen shavings. Mount your completed nesting boxes 18-24 inches above the coop floor level in a quiet, dimly-lit area.
Add ceramic eggs initially to encourage hens to lay in the new boxes, creating a habit that continues naturally.
Benefits of Building Your Own Nesting Box
Building your own nesting boxes isn’t just a fun weekend project; it’s a practical and rewarding way to customize your coop while saving money.
1. Cost-Effective Solution: Building your own nesting boxes saves money compared to buying pre-made ones. With just one sheet of plywood, you can create multiple boxes at a fraction of the cost.
2. Higher Quality Materials: When you build it yourself, you choose sturdy, weather-resistant wood and hardware. This ensures better durability and comfort for your hens.
3. Eco-Friendly Option: Using reclaimed or leftover wood helps reduce waste and supports sustainable living. It’s a great way to create something functional and kind to the environment.
4. Satisfaction of a DIY Project: There’s a special joy in seeing your hens enjoy something you built with your own hands. It’s a rewarding project that blends creativity, skill, and care for your flock.
Common Mistakes to Avoid When Building a Nesting House
Even the simplest DIY projects can go wrong without proper planning. Watch out for these common mistakes that can affect durability, comfort, and overall functionality.
- Using Treated Wood: Avoid pressure-treated wood it contains chemicals that can be toxic to chickens.
- Incorrect Measurements: Uneven cuts or mismatched panels lead to unstable and poorly fitted boxes.
- Making the Entrance Too Small or Too Large: Improper entrance size can discourage hens or invite unwanted pests.
- Forgetting the Lip or Roost Bar: Without a lip, bedding spills out; without a roost bar, hens struggle to perch easily.
- Using Unsafe Screws or Nails: Protruding screws or sharp edges can injure hens while nesting.
- Ignoring Cleaning and Maintenance: Dirty boxes can attract mites, odor, and discourage hens from laying eggs.
Conclusion
As we’ve seen, creating the perfect nesting house doesn’t demand professional expertise or a hefty budget.
With basic materials and the techniques outlined above, you’re now equipped to construct comfortable, functional spaces that encourage consistent laying and protect your eggs.
The best design is one that suits both your chickens’ natural instincts and your specific coop setup. Regular maintenance will ensure longevity.
Now it’s time to put your plans into action. Grab your tools, gather your materials, and start building.