Many homeowners are finding the magic of DIY frame TV projects, turning their ordinary televisions into stunning focal points that blend seamlessly with their décor.
If you’re inspired by those expensive designer frame TVs or simply want to hide your screen when it’s not in use, creating your own custom TV frame is surprisingly achievable.
In this, we’ll walk you through everything you need to know about building a DIY frame TV.
You’ll find practical tips, cost-effective methods, and creative ideas to help you design a beautiful frame. Let’s turn that plain television into a statement piece!
What is a DIY TV Frame?
A DIY TV frame is a custom-built border or casing designed to amplify the look of your television.
Instead of leaving the TV as a plain black rectangle on the wall, a DIY frame adds a decorative touch that blends it with your home’s style, whether rustic, modern, or classic.
Typically made from wood, moulding, or lightweight materials, it surrounds the screen without blocking any sensors or vents.
Many homeowners create their own TV frames to save money compared to store-bought options, while also getting a personalized look.
A well-designed DIY TV frame not only betters the aesthetic of your entertainment area but also hides cords and mounts for a cleaner, more built-in appearance.
Materials and Tools You’ll Need
| Tools Needed | Materials Required |
|---|---|
| Tape measure | Wood molding or trim pieces |
| Miter saw or miter box | Wood glue |
| Sandpaper or sanding block | Wood stain or paint |
| Drill with bits | Screws (various sizes) |
| Level | Velcro strips (heavy-duty) |
| Pencil | Wood filler |
| Clamps | Paintbrush or foam applicator |
| Safety glasses | Painter’s tape |
Step-by-Step Guide to Building the DIY TV Frame
Follow these simple steps to build your own DIY TV frame that looks professional, fits perfectly, and complements your home’s décor.
Step 1: Measure Your Television Accurately
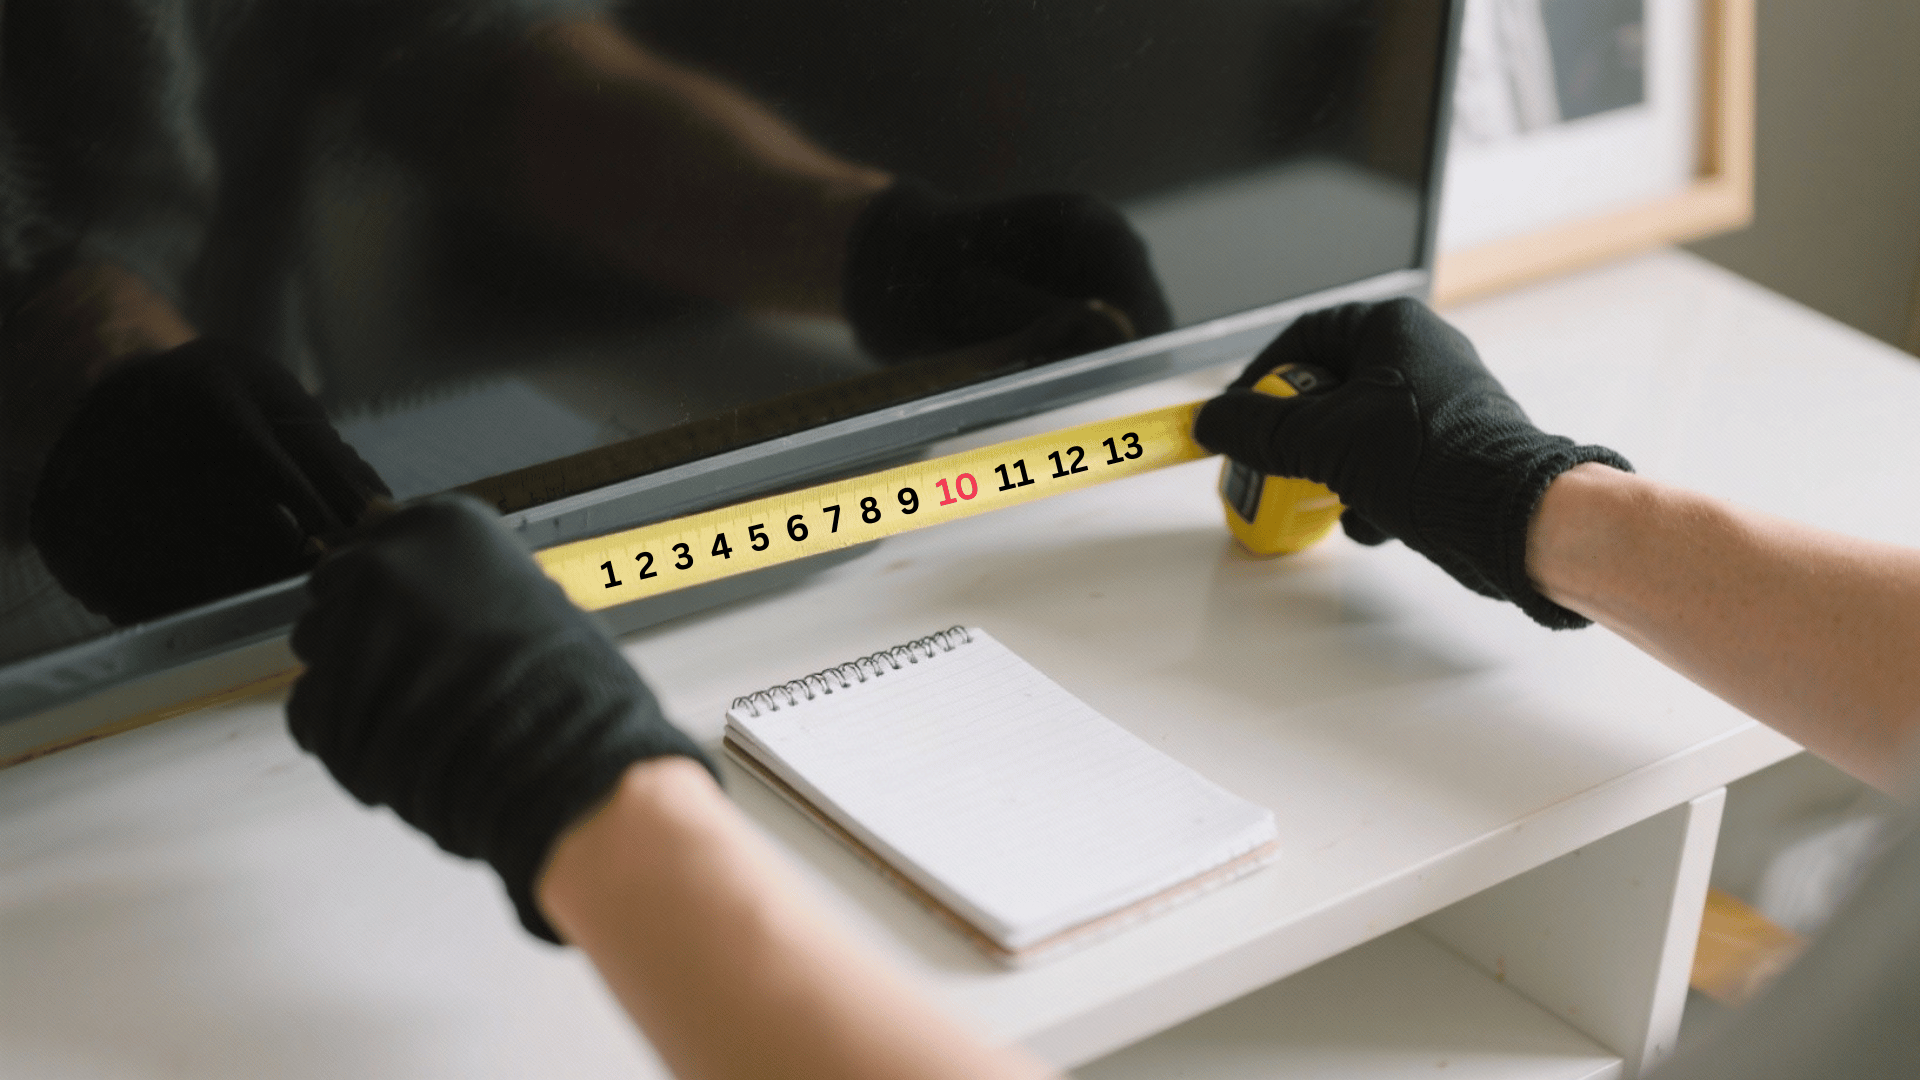
Begin by measuring your TV’s visible screen dimensions from edge to edge, excluding the bezel. Add your desired frame width to each side; typically, 2-4 inches works beautifully.
Record all measurements carefully, including screen depth, to ensure your frame sits flush against the wall. Consider the TV’s mounting brackets and ventilation needs when planning frame depth.
Double-check every measurement before purchasing materials, as accuracy here determines your entire project’s success and professional appearance.
Step 2: Cut and Prepare Frame Pieces
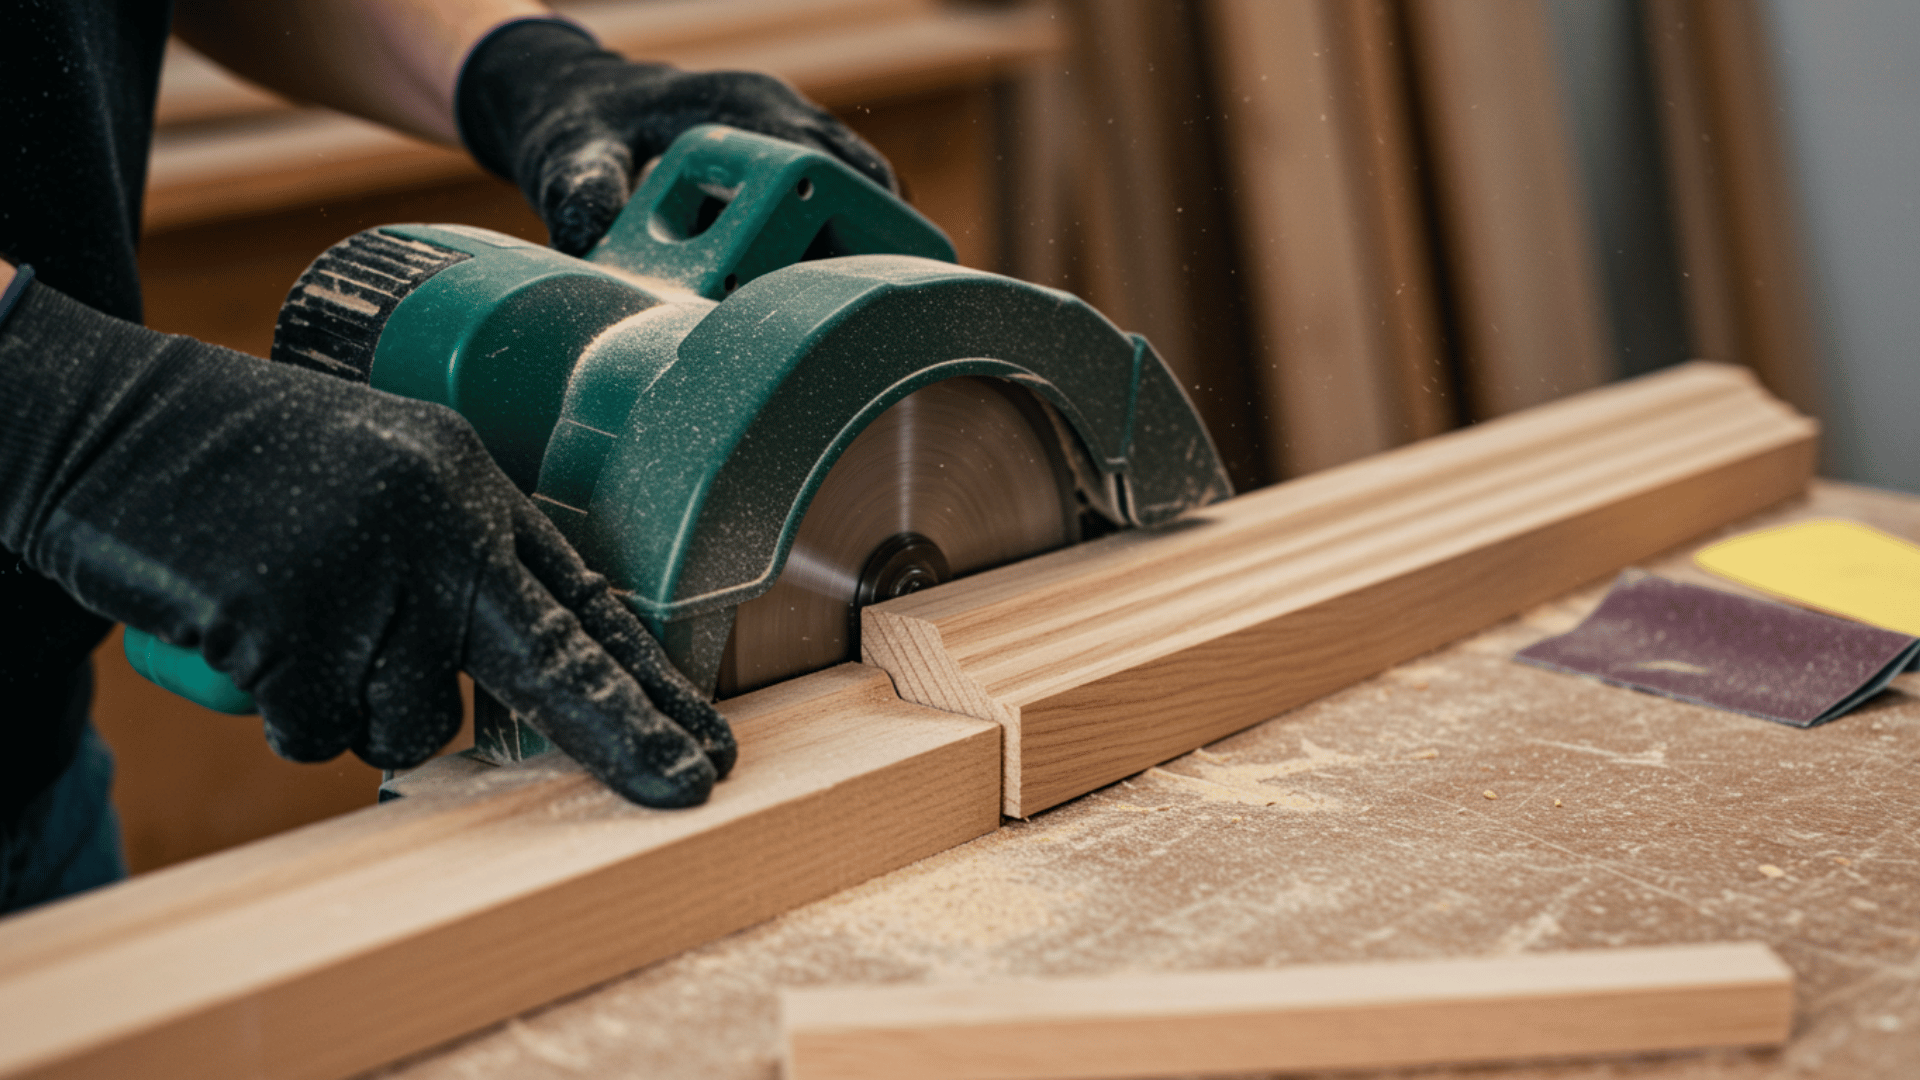
Using your measurements, cut four pieces of molding at 45-degree angles for perfect corner joints.
A miter saw ensures clean, precise cuts essential for professional-looking corners. Sand all pieces thoroughly, starting with medium-grit sandpaper and finishing with fine-grit for smooth surfaces.
Apply wood filler to any imperfections, let dry, then sand smooth again. This preparation stage significantly impacts your frame’s final appearance and finish quality.
Step 3: Assemble and Secure the Frame
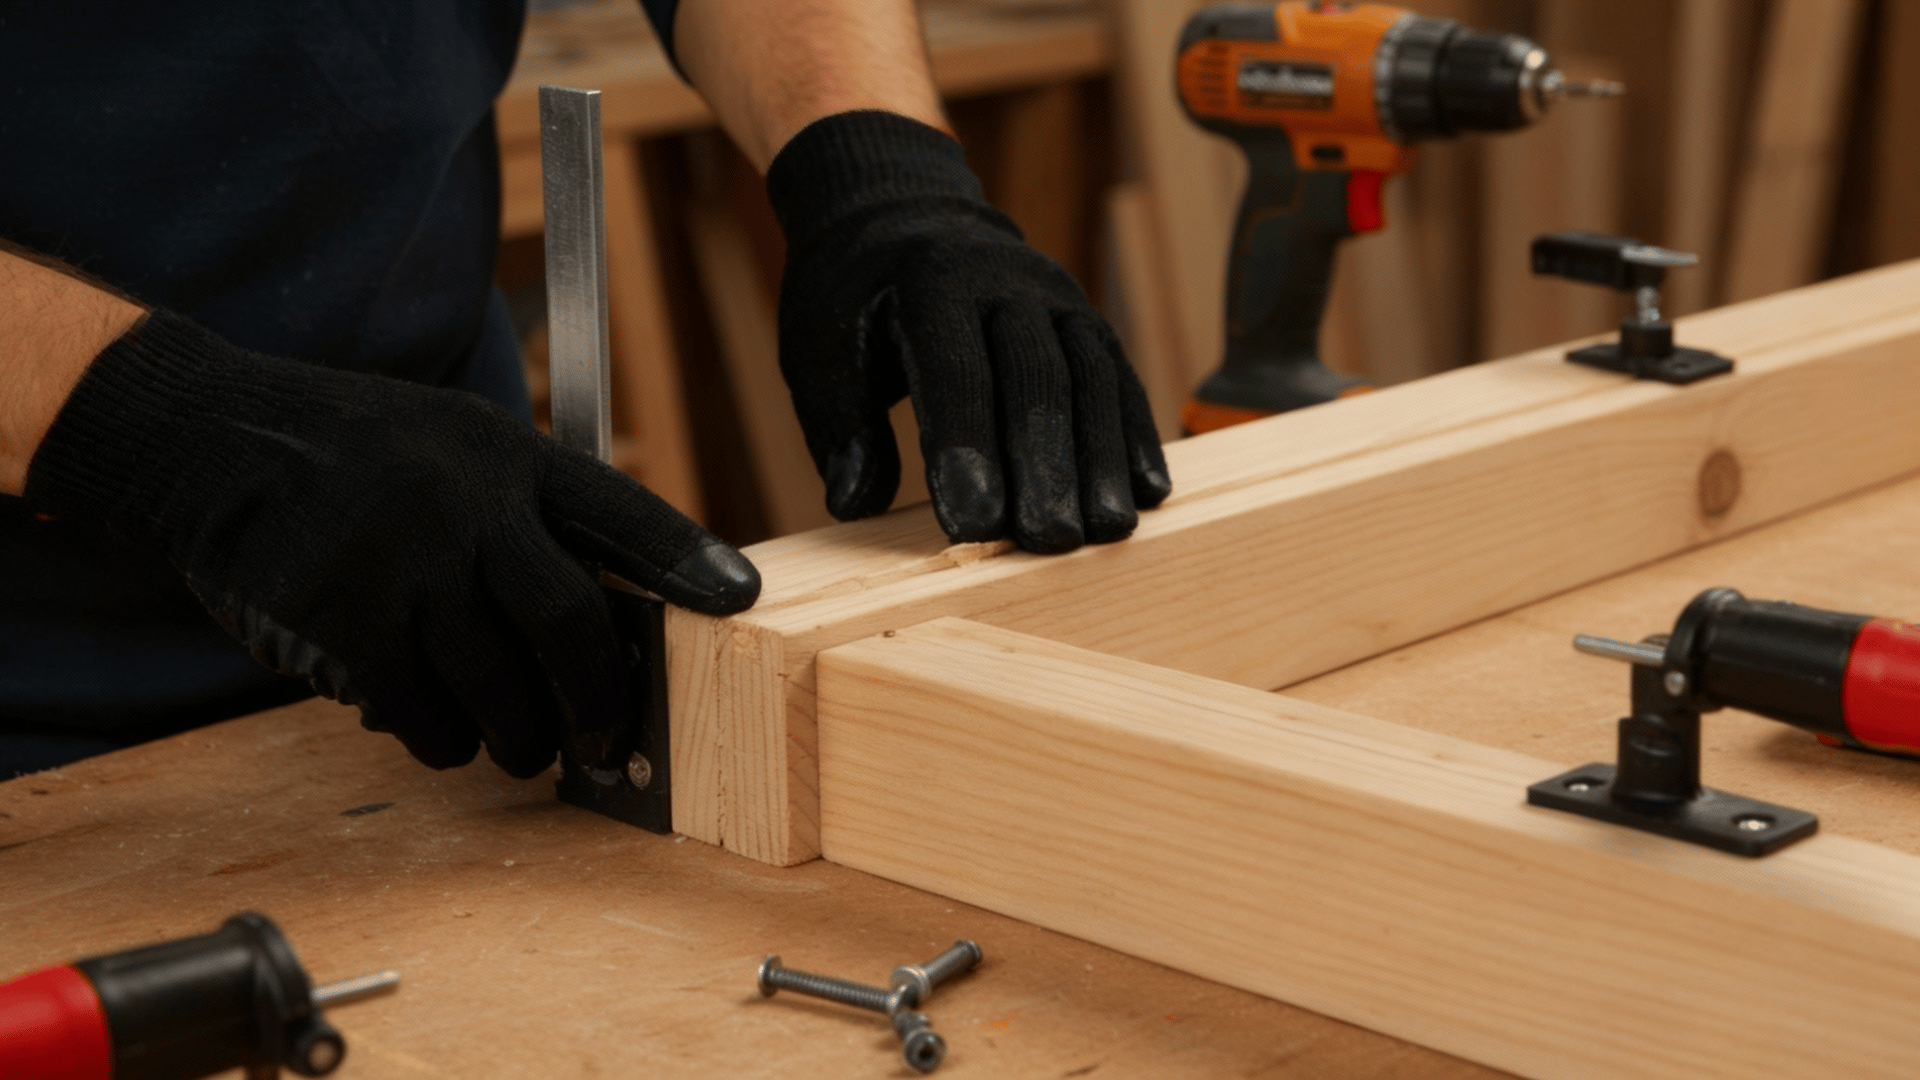
Lay frame pieces on a flat surface, arranging them in proper order around your TV’s dimensions. Apply wood glue to mitered corners and press together firmly.
Use corner brackets on the back for additional stability, drilling pilot holes to prevent wood splitting. Clamp corners while the glue dries completely, typically 2-4 hours.
Check that the frame remains perfectly square using a level or measuring diagonals. This structural integrity ensures your frame maintains its shape when mounted.
Step 4: Finish and Seal Your Frame

Apply your chosen stain or paint using smooth, even strokes following the wood grain direction. Allow the first coat to dry completely before lightly sanding and applying additional coats for depth.
For stained frames, finish with polyurethane sealer for protection and lustrous shine. Painted frames benefit from multiple thin coats rather than single thick applications.
Let the frame cure fully for 24-48 hours before handling or mounting to prevent smudges and ensure durability.
Step 5: Mount the Frame to the Television
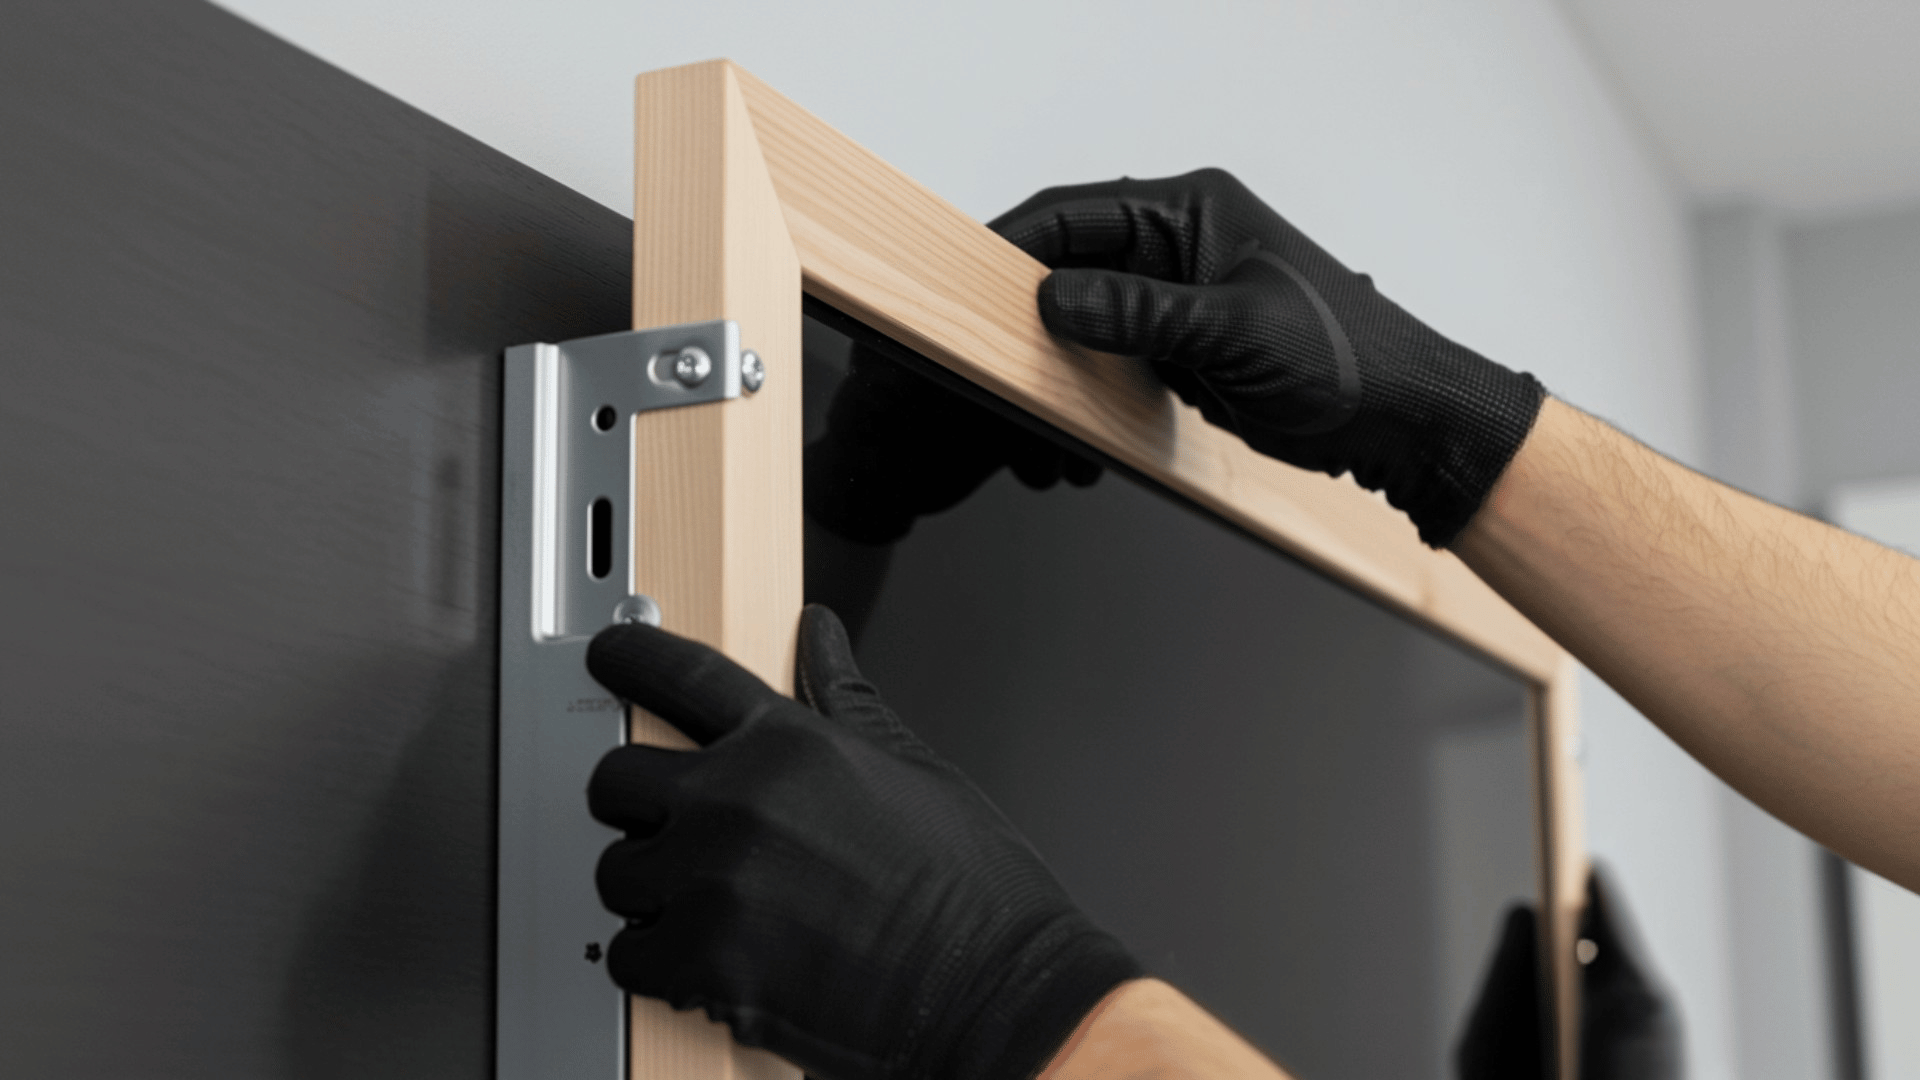
Attach a heavy-duty hanger to the frame’s back edges and corresponding TV bezel locations, ensuring even distribution for a secure hold.
Alternatively, use small L-brackets screwed into the frame back that hook onto the TV edges. Carefully align the frame with the television screen, pressing firmly if using securing brackets.
Step back to verify even spacing on all sides and adjust as needed. Your DIY frame TV is now complete and ready to impress everyone who sees it.
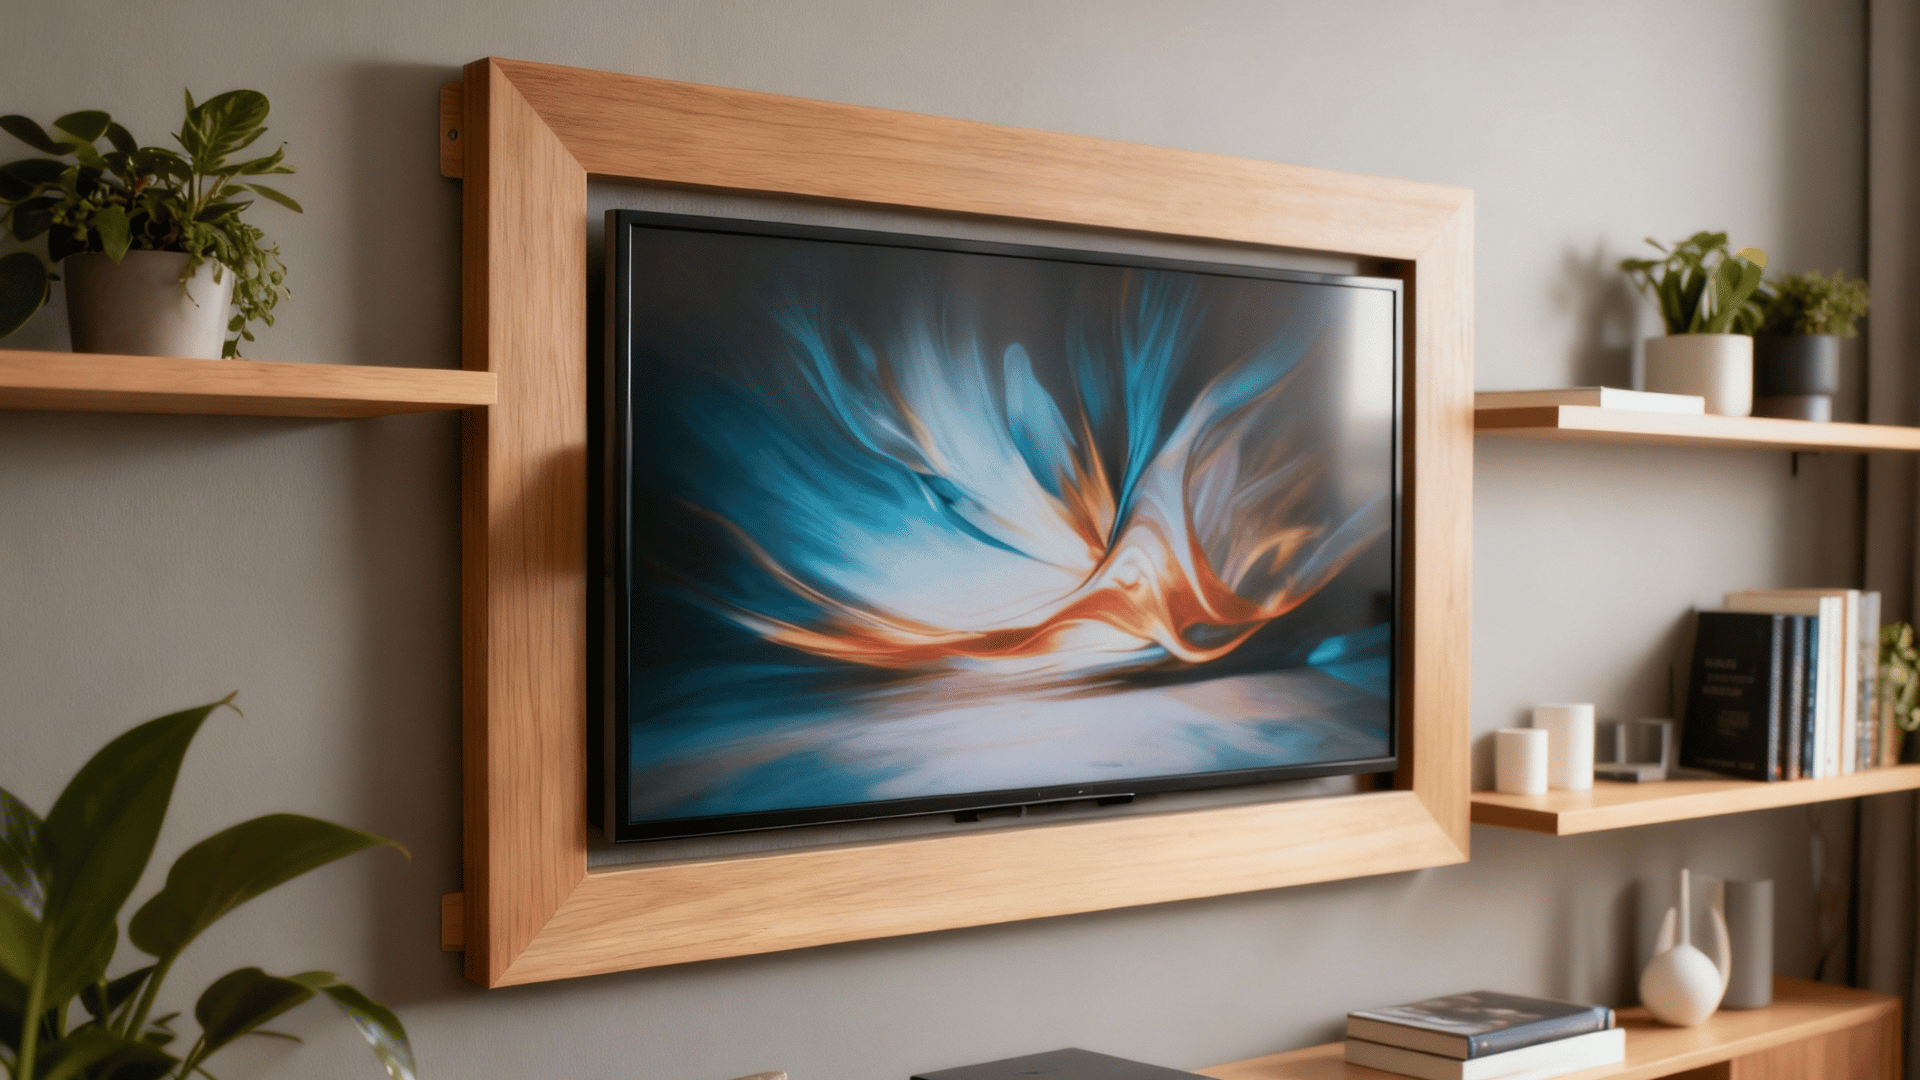
Step 6: Final Look and Display
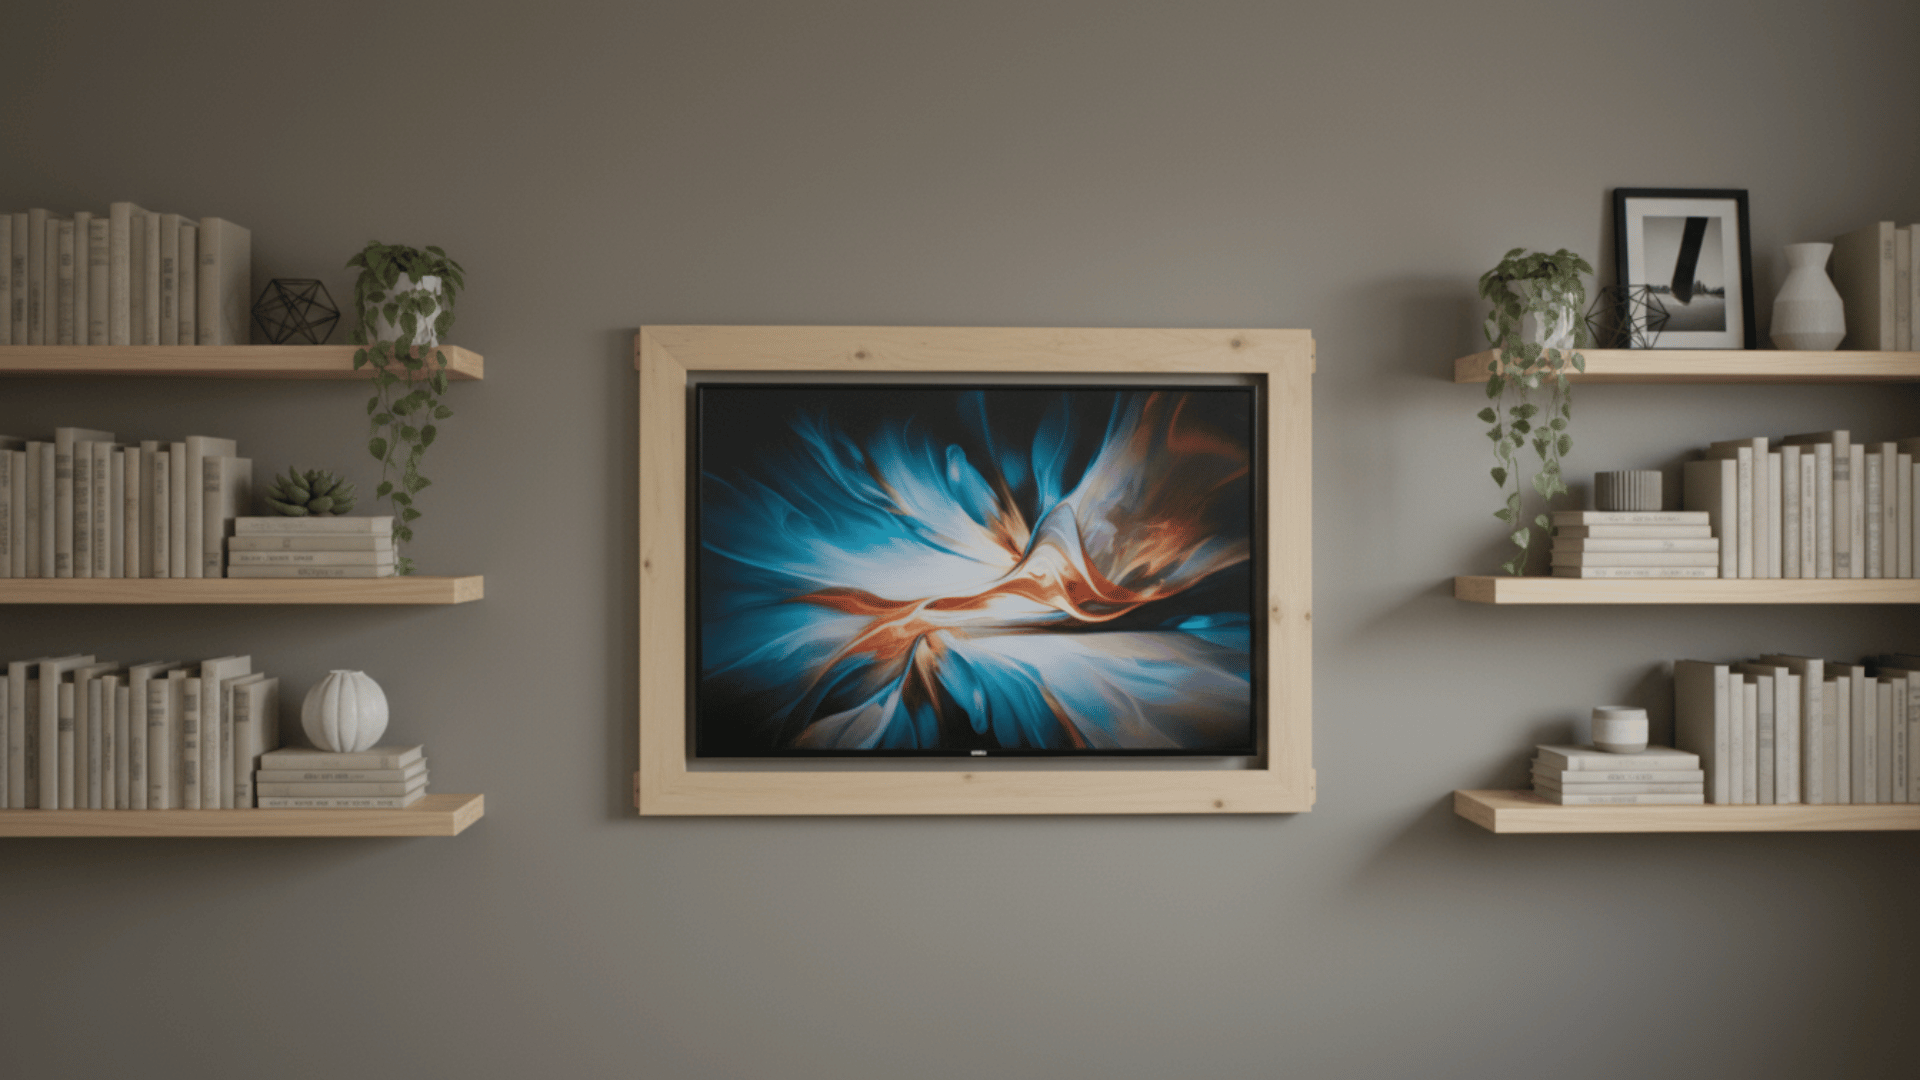
Step back and admire your completed DIY frame TV transformation. The custom frame should sit flush against your television with even spacing on all sides, creating a gallery-worthy appearance.
Test the frame’s security by gently pressing edges to ensure Velcro or brackets hold firmly. When powered on, your TV now resembles an elegant piece of framed artwork.
Consider displaying art mode or family photos when not watching to maximize the sophisticated aesthetic you’ve created affordably.
Tips for Maintenance and Upgrades
Keeping your DIY TV frame in great shape doesn’t take much effort. With a few simple maintenance habits, you can preserve its look and even upgrade it over time.
1. Clean Regularly and Gently: Wipe your TV frame weekly with a microfiber cloth to remove dust. Avoid harsh cleaners; use mild soap and water to protect the finish.
2. Refinish or Touch Up When Needed: Over time, paint or stain can fade. Lightly sand and reapply finish as needed, and keep extra paint on hand for quick touch-ups.
3. Check Stability and Alignment: Inspect screws and brackets every few months. Tighten loose hardware and ensure the frame sits evenly around your TV.
4. Upgrade for Functionality: Add useful features like hinges for easy access, LED lighting for ambience, or hidden storage for remotes and cables.
5. Adapt for New TVs or Decor Styles: If you upgrade your TV or redecorate, resize, or repaint the frame to match your new setup. A simple color change can refresh the entire look
Common Mistakes to Avoid
While building a TV frame is a rewarding project, small oversights can lead to big issues. Here are the most common mistakes to avoid for a secure and polished finish.
- Incorrect Measurements: Failing to measure your TV (including bezel and ports) accurately can result in a frame that blocks sensors or doesn’t fit properly.
- Blocking Ventilation: Covering air vents can cause your TV to overheat. Always leave enough space for airflow around the edges.
- Using Weak Mounting Hardware: Lightweight or improper brackets can cause the frame to sag or fall. Use sturdy wall mounts and screws rated for your TV’s weight.
- Skipping Surface Preparation: Painting or staining without sanding and priming first leads to uneven finishes or peeling over time.
- Ignoring Cable Management: Leaving cords visible ruins the clean look. Plan routes or use clips and channels to hide cables neatly.
- Choosing the Wrong Material: Heavy or untreated wood can warp, while cheap MDF may chip easily. Opt for high-quality, lightweight wood or trim.
Conclusion
By following these simple steps and using affordable materials, you’ve learned how to make an ordinary television into a classy centerpiece.
You’ve achieved this look for a fraction of the retail price while adding your personal touch.
No matter if you choose rustic wood, sleek modern molding, or ornate traditional frames, you’ve created something unique that guests will admire.
So grab those tools, measure twice, cut once, and get ready to enjoy your beautifully framed television. Don’t forget to share your DIY frame TV creation with friends, they’ll definitely want one too!