Creating a DIY bar at home is one of the most enjoyable ways to blend creativity, style, and practicality.
You dream of a cozy corner for quiet evenings or a lively setup for entertaining guests, and building your own home bar offers endless possibilities.
You’ll find practical ideas, simple steps, and inspiring tips to help you bring your direction to life.
Ready to turn an empty corner into your favorite gathering spot? Let’s get started on building your perfect DIY bar today!
What is a DIY Home Bar?
A DIY home bar is a personalized space you design and build to enjoy and serve drinks at home. It can be as simple as a small counter in your kitchen or as elaborate as a custom setup in your basement or patio.
Creating your own bar lets you choose the design, materials, and features that match your taste and space.
It often includes shelves for bottles, racks for glasses, and a countertop for mixing drinks. Many people also add seating, lighting, and décor to create a cozy, welcoming atmosphere.
Building a DIY bar is not only affordable but also a fun project that adds personality and function to your home, perfect for hosting friends or relaxing after a long day.
Common Essential Tools and Materials for a DIY Home Bar
| Tools | Materials |
|---|---|
| Cocktail shaker | Wood or reclaimed wood |
| Jigger | Bar counter or tabletop |
| Strainer | Shelves or racks |
| Bar spoon | LED strip lighting |
| Muddler | Brackets and fasteners |
| Bottle opener | Sealant or finish |
| Corkscrew | Paint or wood stain |
| Power drill | Mini fridge or wine cooler |
| Measuring tape | Stools or seating |
| Sandpaper | Decorative accents |
Stylish Setups of Home Bar Ideas for Every Room
From cozy kitchen nooks to elegant living rooms, a well-designed home bar brings both function and flair to your space.
1. Classic Wooden Back Bar with Mirrored Shelving
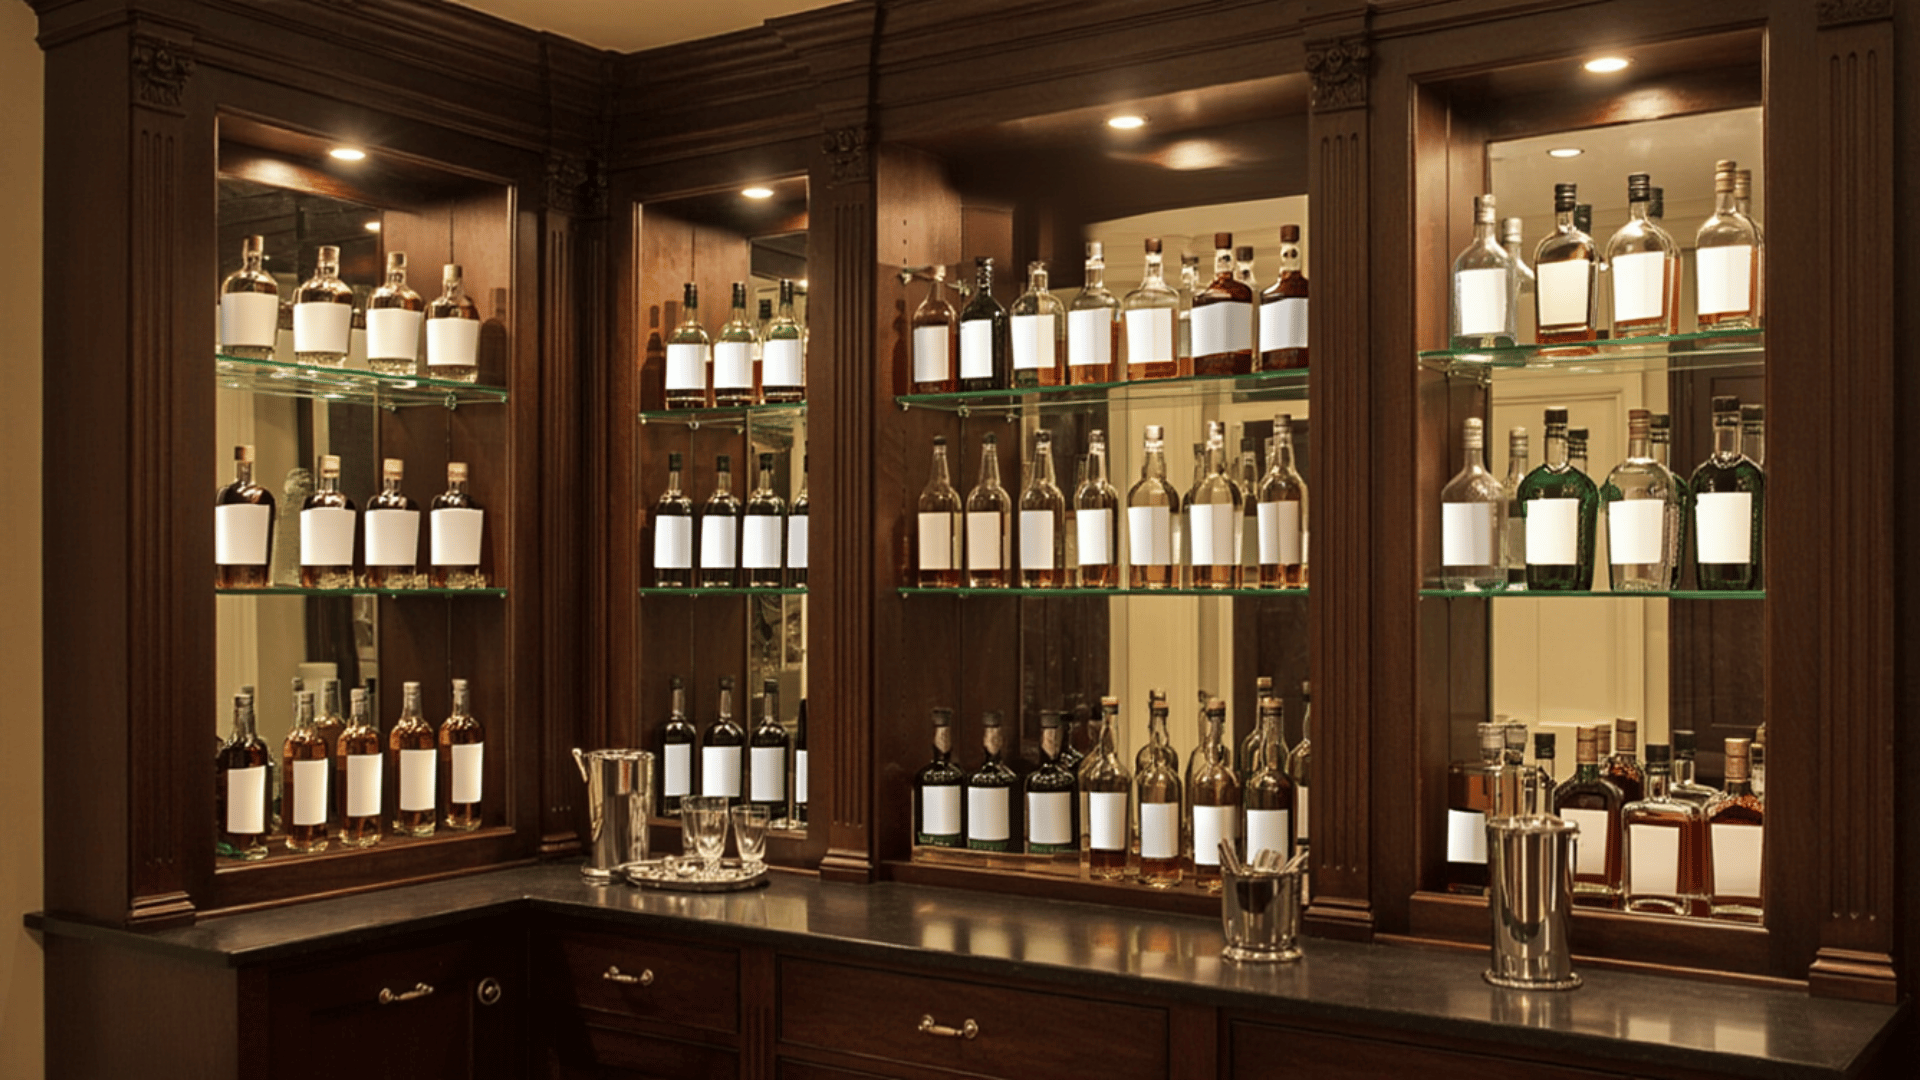
Traditional wooden back bars feature rich mahogany or walnut finishes with built-in shelving and mirrored backing that reflects bottles beautifully while creating a depth illusion.
The mirror amplifies ambient lighting and makes collections appear more extensive. Ornate molding and brass hardware add refined touches.
How to Achieve this Look:
- Install mirrored backing on the wall, then mount wooden shelving brackets at staggered heights for visual interest.
- Choose rich-stained hardwood with decorative molding; add a brass rail along the bar edge and ornate cabinet hardware.
- Incorporate subtle LED strip lighting above shelves to enhance mirror reflections and illuminate bottle labels effectively.
2. Wine-Focused Bar with Stemware Chandelier
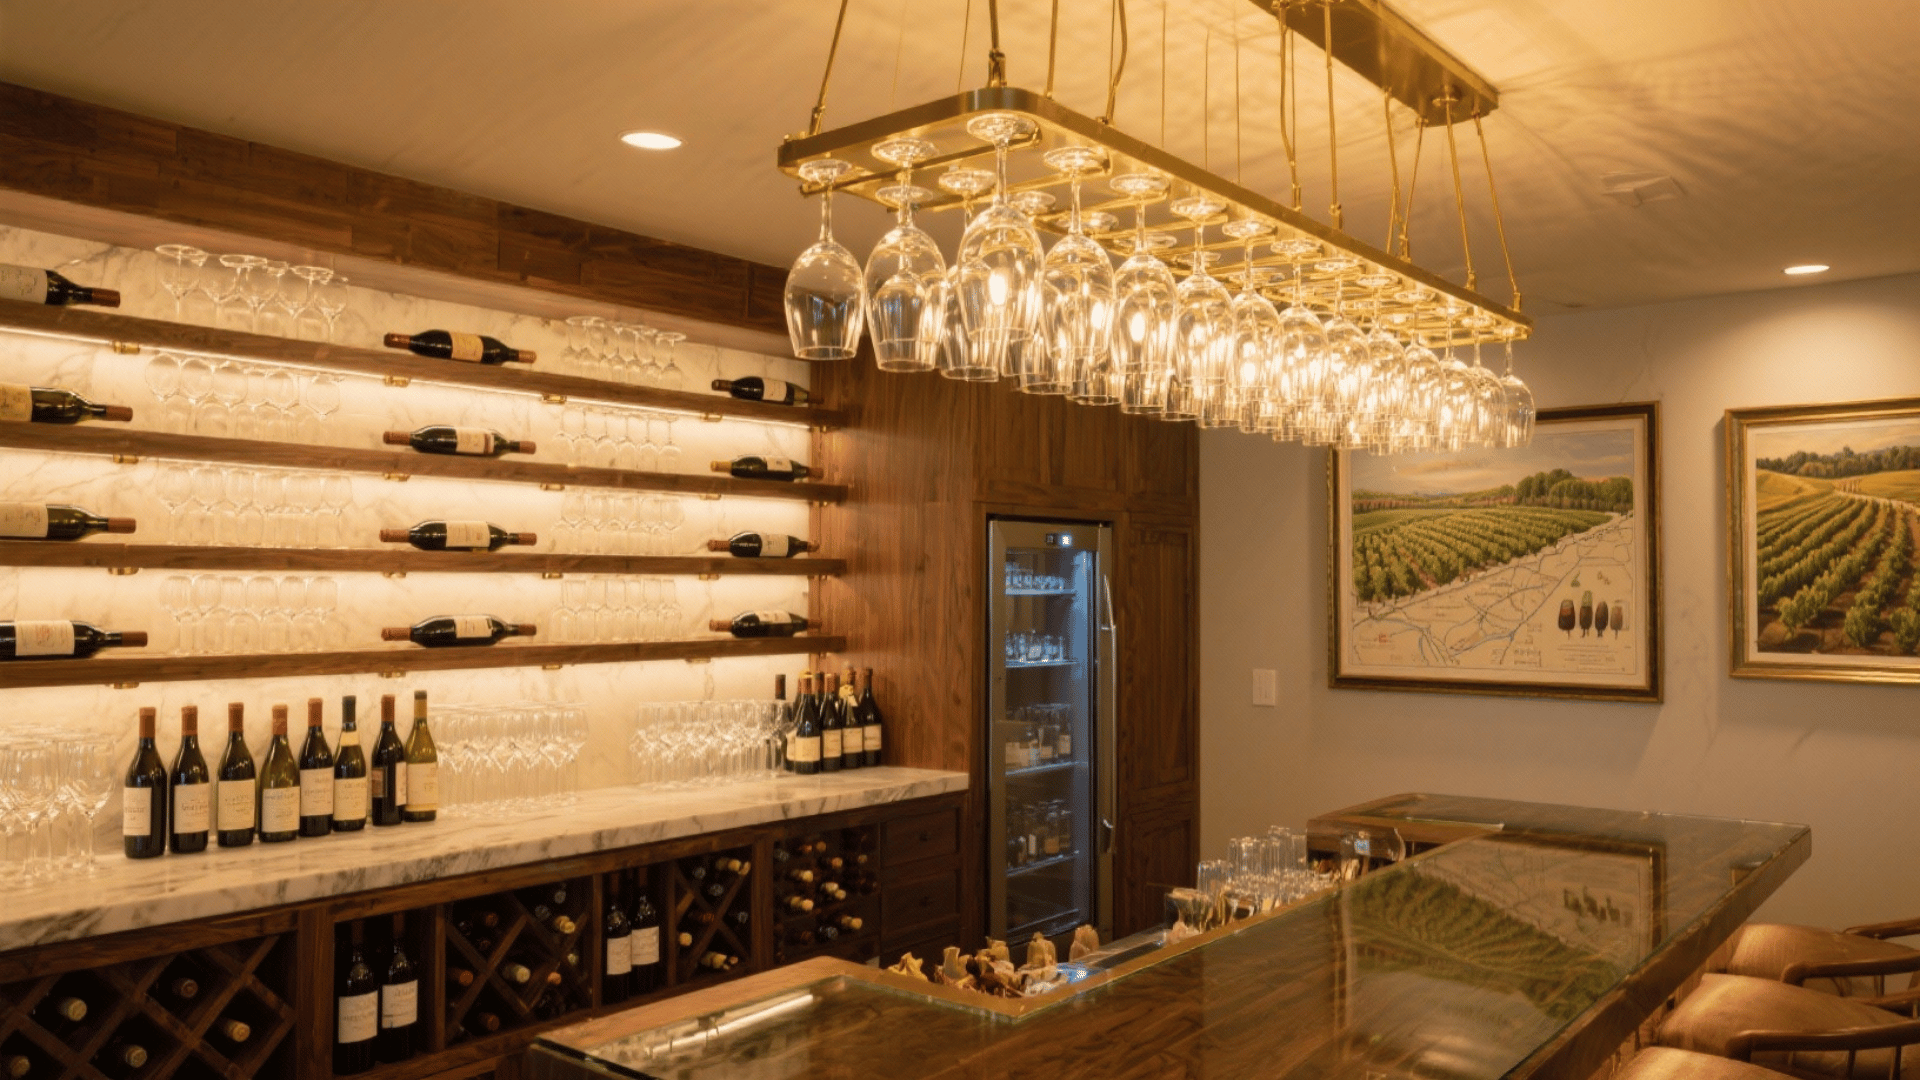
Specialized wine bars feature horizontal bottle storage, temperature-controlled wine refrigerators, and overhead stemware racks arranged as decorative chandeliers.
Multiple wine glass types hang inverted from ceiling-mounted or cabinet-bottom racks, providing easy access while creating sculptural displays.
How to Achieve this Look:
- Install the wine refrigerator unit and horizontal bottle racks at appropriate heights for red and white wine storage.
- Mount ceiling or under-cabinet stemware holders in geometric patterns to create a chandelier effect with varying glass types.
- Add wine-themed artwork, vineyard maps, and tasting note displays to reinforce an oenophile atmosphere throughout the space.
3. Rustic Barrel Bar with Reclaimed Wood
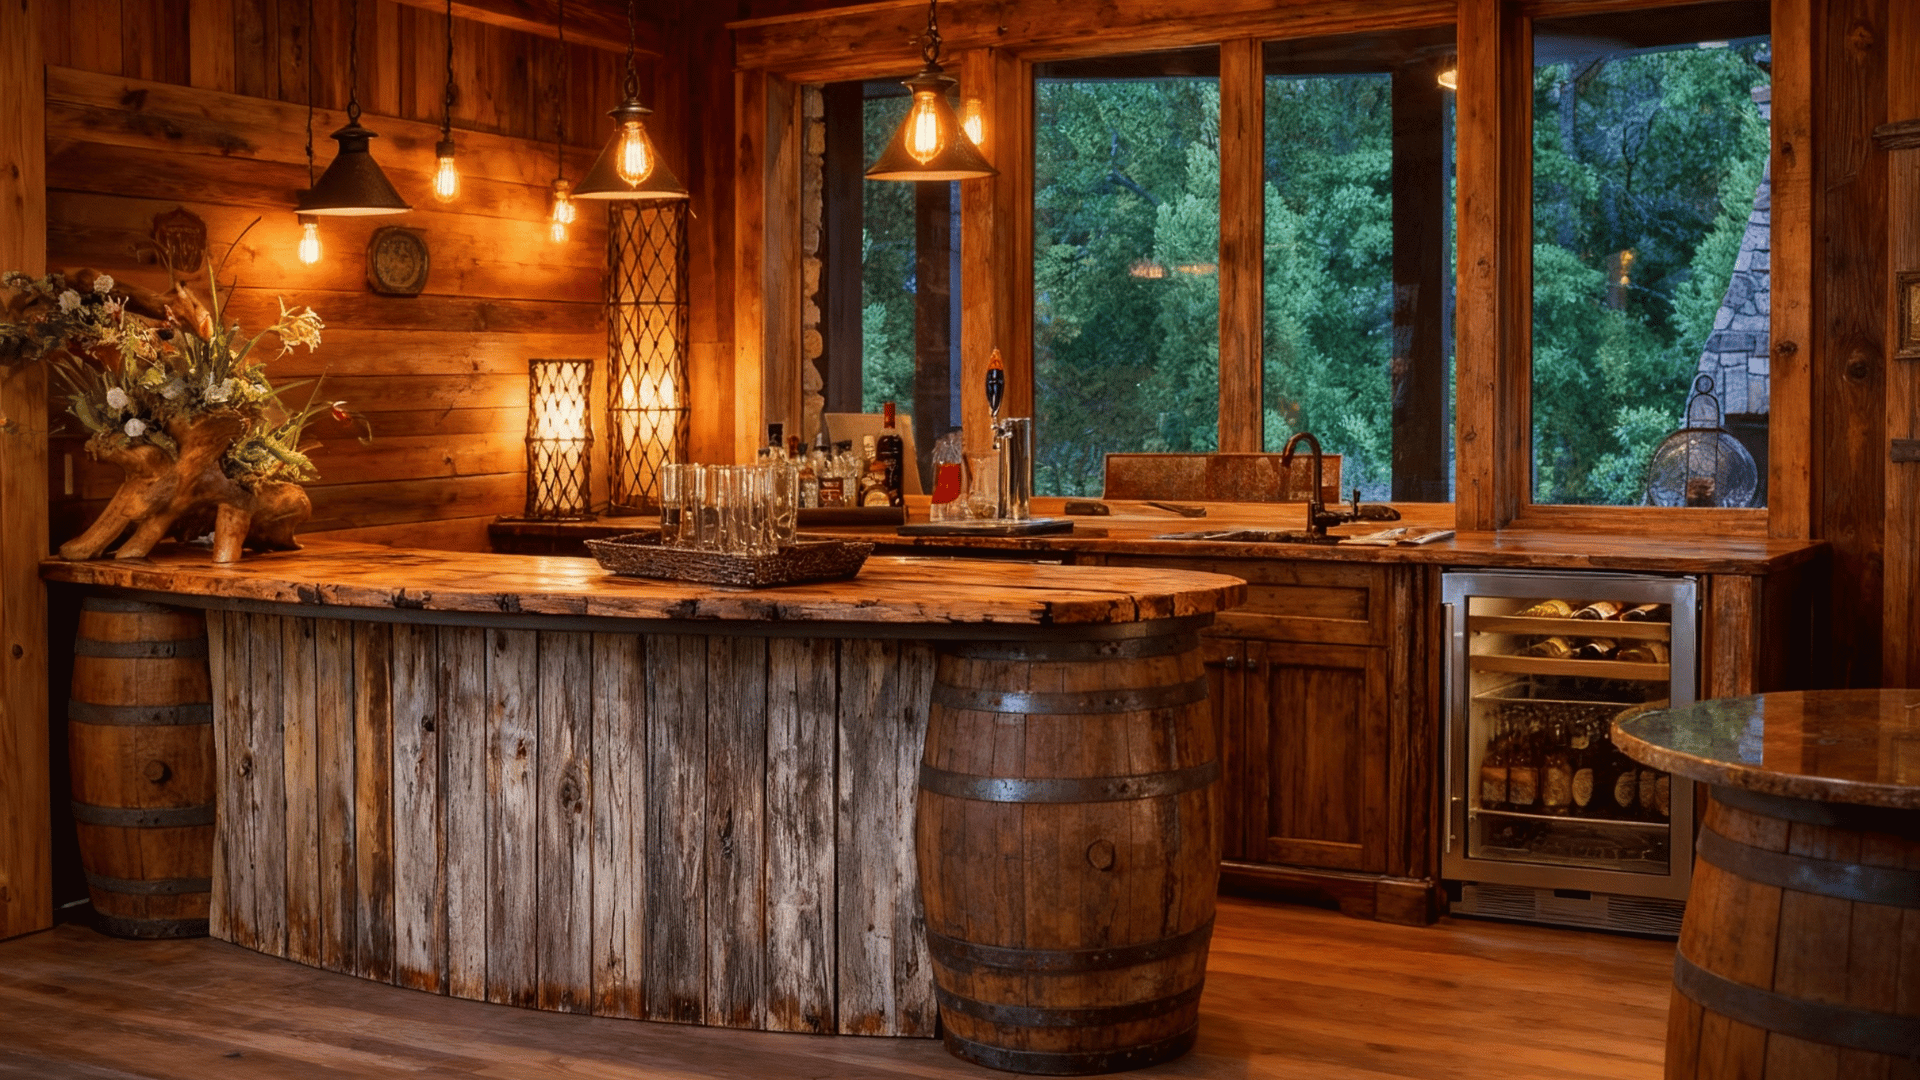
Repurposed whiskey or wine barrels topped with reclaimed barn wood create characterful rustic bars perfect for farmhouse, cottage, or lodge aesthetics.
The barrel bases provide built-in storage for bottles, while weathered wood tops offer authentic patina impossible to replicate. Metal barrel bands become decorative accents.
How to Achieve this Look:
- Source authentic whiskey/wine barrels from breweries or online suppliers; cut openings for bottle storage access inside.
- Secure reclaimed barn wood planks across barrel tops using construction adhesive and hidden brackets for stability.
- Seal wood surfaces with a food-safe finish while preserving natural weathering; add vintage bar tools and Edison bulb lighting.
4. Repurposed Armoire Cocktail Cabinet
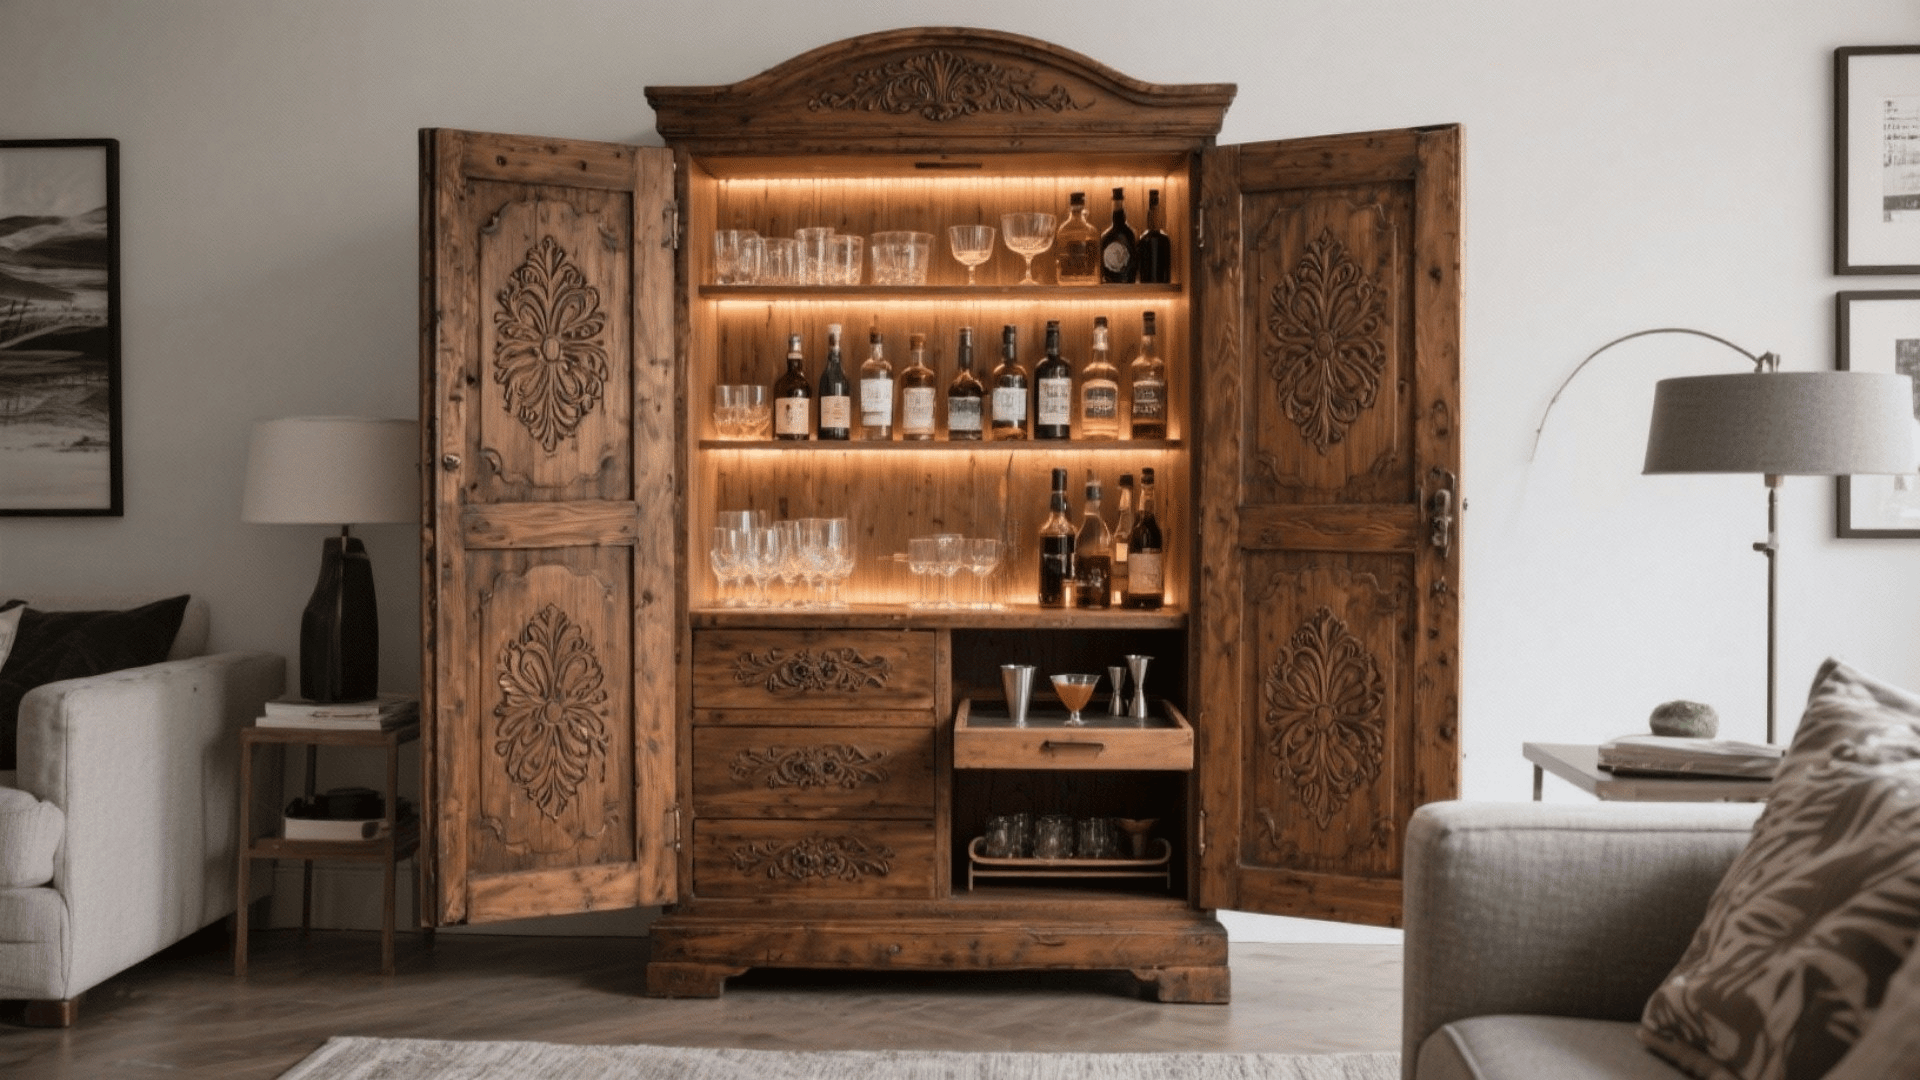
Vintage armoires into charming hidden bars when fitted with interior shelving, stemware racks, and LED lighting. Closed doors conceal bar contents completely.
Interior modifications include bottle storage, pull-out mixing surfaces, and hooks for bar tools. The exterior finish can remain original for vintage appeal or receive fresh paint.
How to Achieve this Look:
- Remove existing shelves and install adjustable ones at appropriate heights for bottles and glassware
- Add battery-operated LED strip lights inside the top and install a stemware rack under the upper shelf
- Mount small hooks for bar tools and consider adding a pull-out tray for the mixing surface
5. Floating Wall-Mounted Bar Shelves
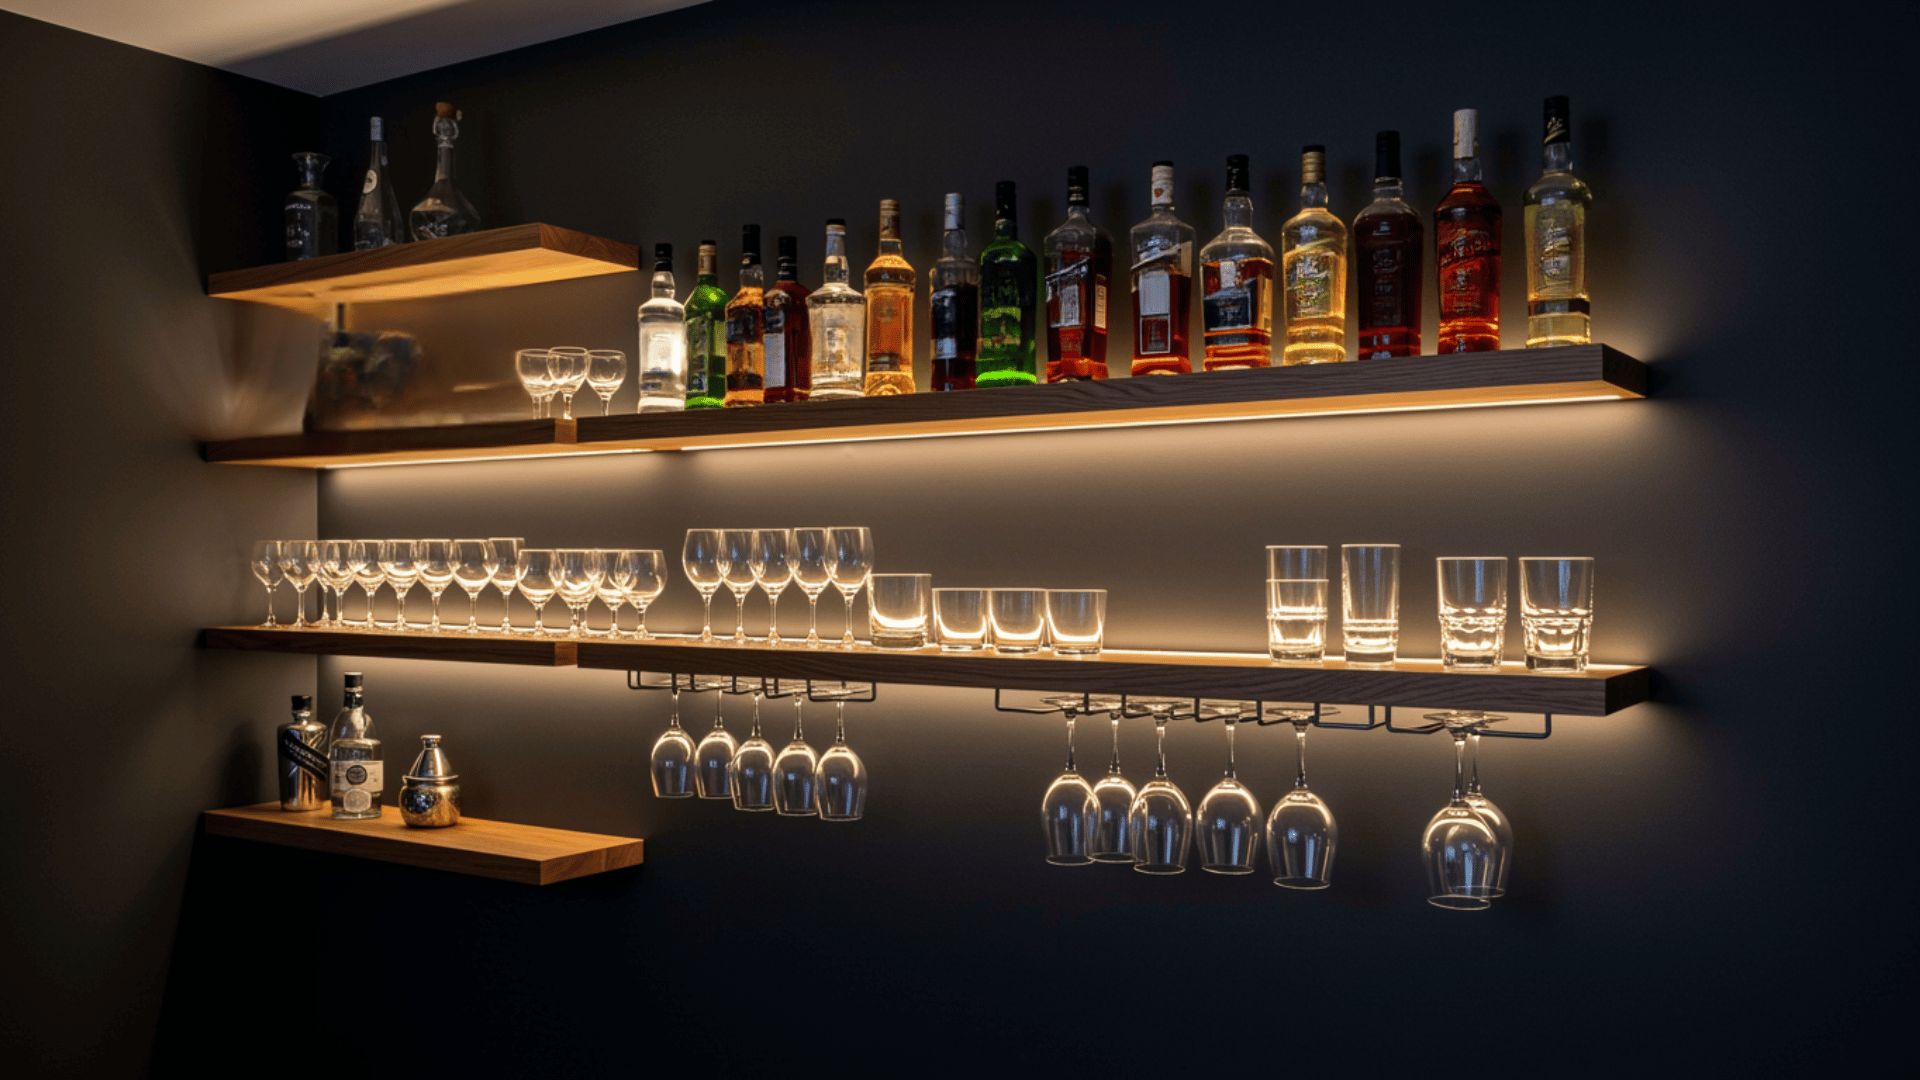
Minimalist floating shelves in wood, metal, or acrylic create contemporary bar displays without floor space consumption. Staggered arrangements add visual interest.
Under-shelf lighting highlights glassware and spirits dramatically. Some designs incorporate stemware holders beneath shelves for suspended wine glass storage.
How to Achieve this Look:
- Install floating shelf brackets into wall studs and secure shelves in staggered heights.
- Add adhesive LED strip lighting underneath each shelf for a dramatic backlighting effect.
- Attach stemware holder racks beneath lower shelves for hanging wine glasses upside down.
6. Converted Console Table Bar
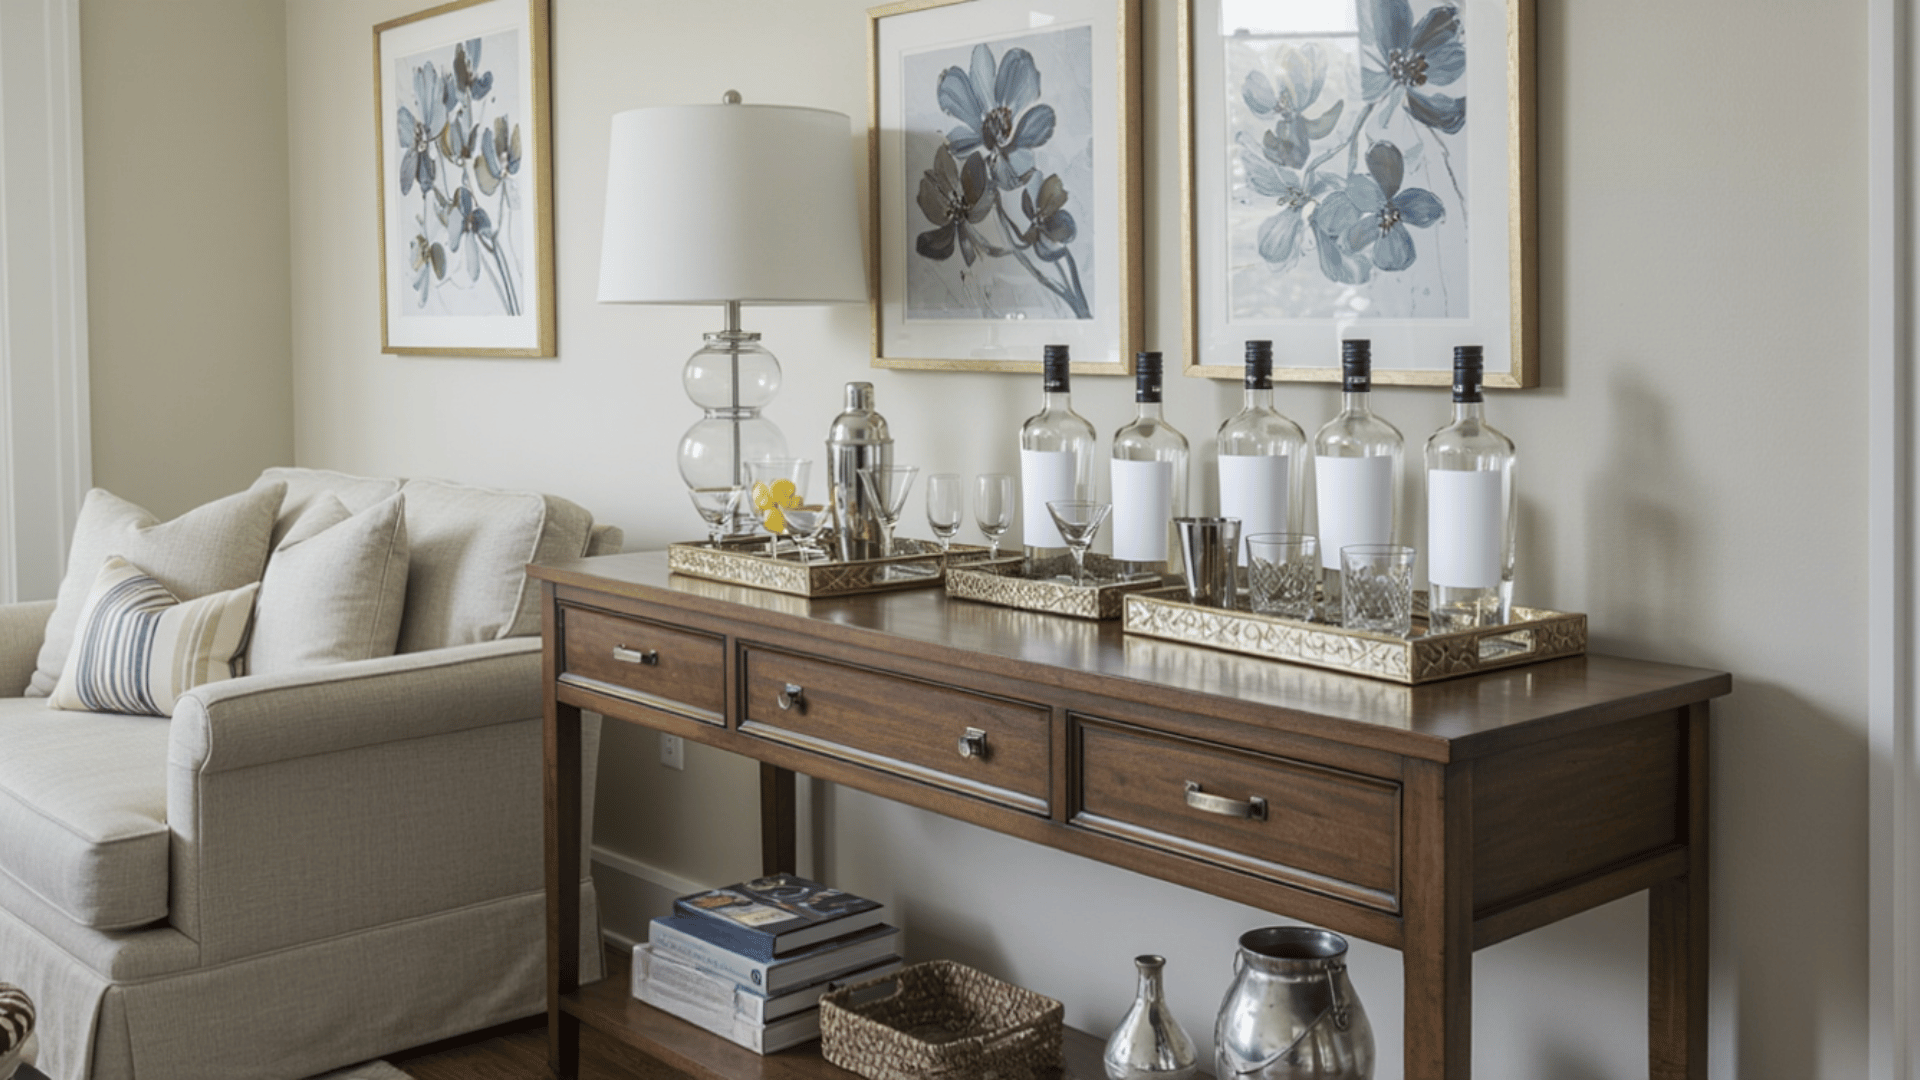
Narrow console tables repurposed as bars fit perfectly in dining rooms, hallways, or behind sofas, utilizing often-wasted space efficiently.
Decorative trays corral frequently used items while maintaining an organized appearance. This accessible solution requires zero construction, simply styling existing furniture for bar purposes.
How to Achieve this Look:
- Select a narrow console table with drawer storage and position it against the wall or behind the sofa.
- Arrange bottles on decorative trays with bar tools stored in drawers or attractive containers.
- Add a small wine rack or stemware holder on the lower shelf and style with cocktail books.
7. Corner Bar Maximizing Awkward Spaces
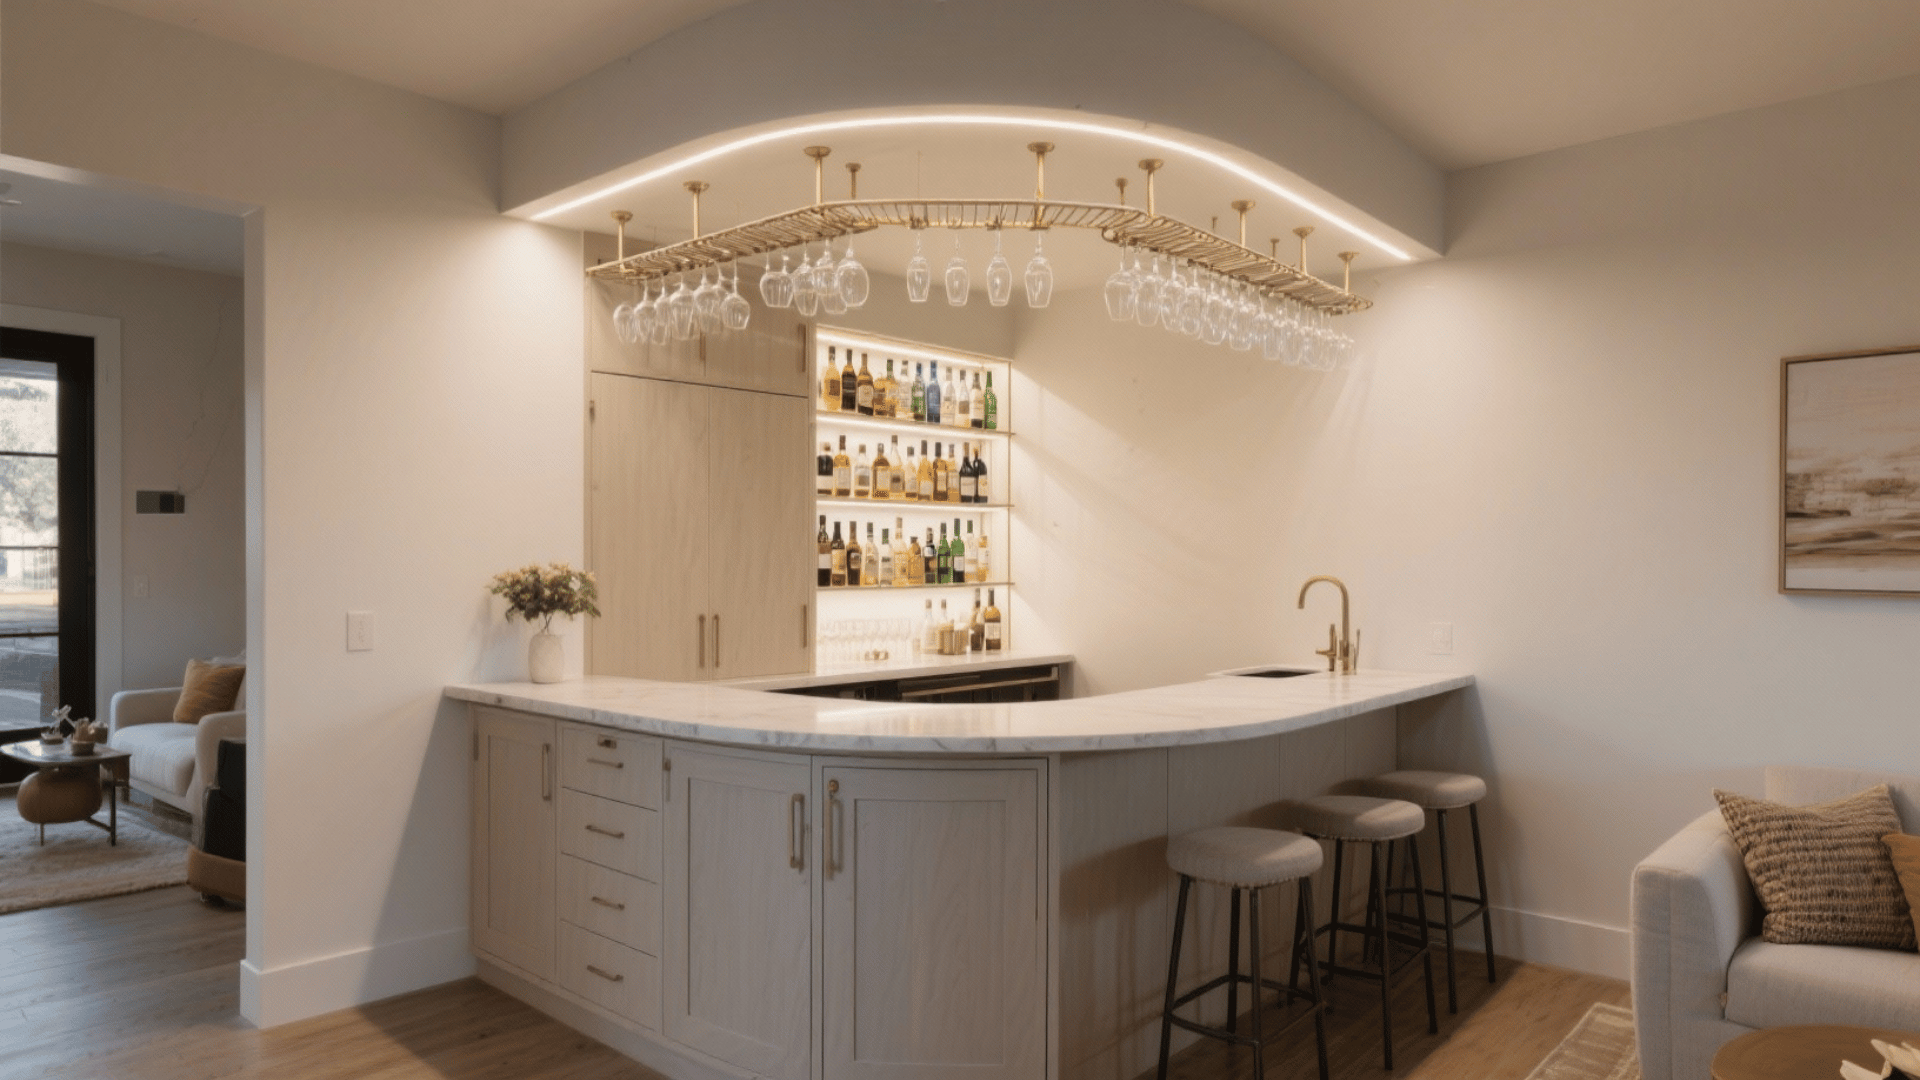
Custom corner bars are made into difficult-to-furnish angles into functional entertainment areas through triangular or curved designs.
Vertical storage maximizes limited floor space through floor-to-ceiling bottle displays and hanging glass racks. Corner placement frees wall space for other furniture while creating coziness.
How to Achieve this Look:
- Build or purchase a triangular corner shelving unit and install it floor-to-ceiling for maximum storage.
- Add an angled counter at a comfortable height with a curved front edge for guest accessibility.
- Mount stemware racks on the underside of the upper shelves and install corner LED lighting.
8. Built-In Window Seat Bar Combination
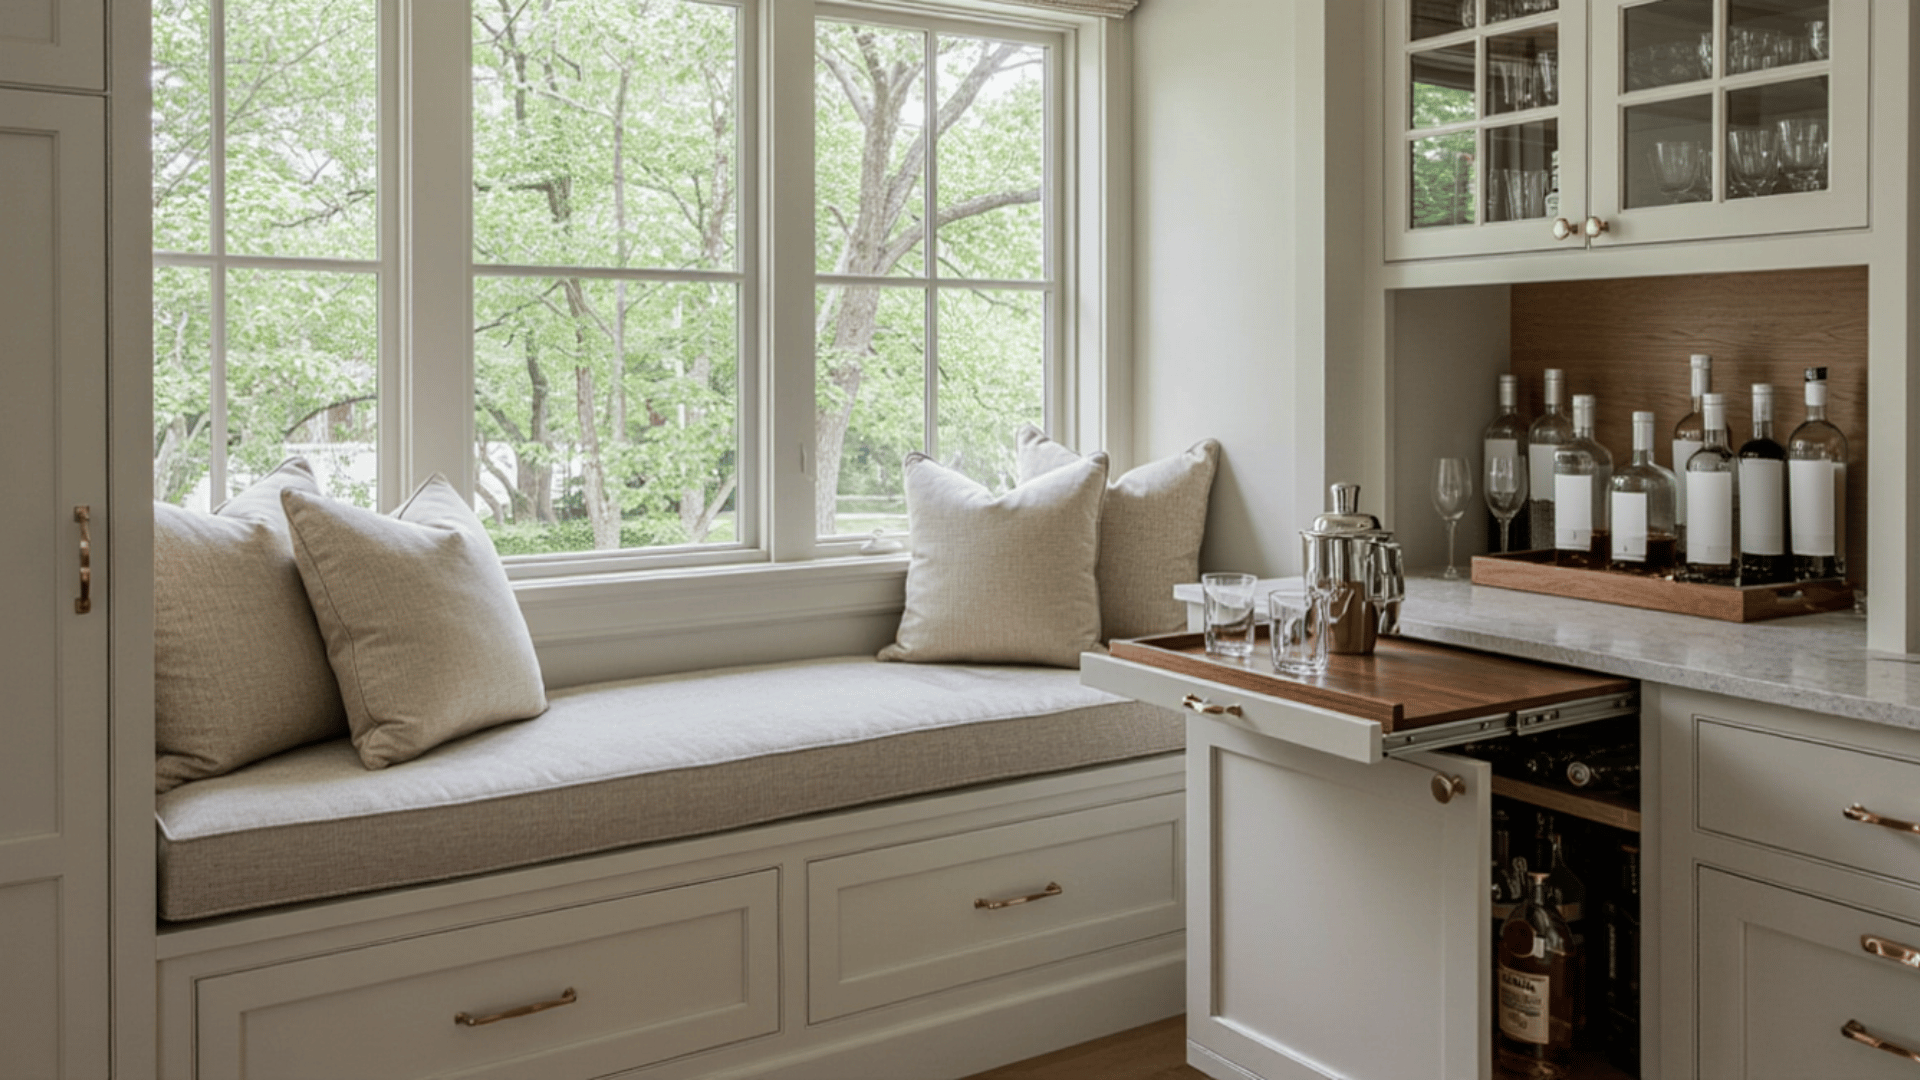
Making window seat areas into dual-purpose bars creates charming nooks with natural light and views. Lower cabinets beneath seating store bottles and glassware.
Small pull-out surfaces or flip-up sections offer mixing areas without permanent counter space. Cushioned seating allows guests to relax while enjoying drinks with scenic outlooks.
How to Achieve this Look:
- Build a cabinet base with doors beneath a window and add a hinged seat top for hidden storage
- Install a pull-out mixing tray or a fold-down surface on the side of the cabinet for drink preparation
- Add comfortable cushions on top and arrange bottles attractively in the lower cabinet storage
9. Outdoor Patio Bar with Weather-Resistant Materials
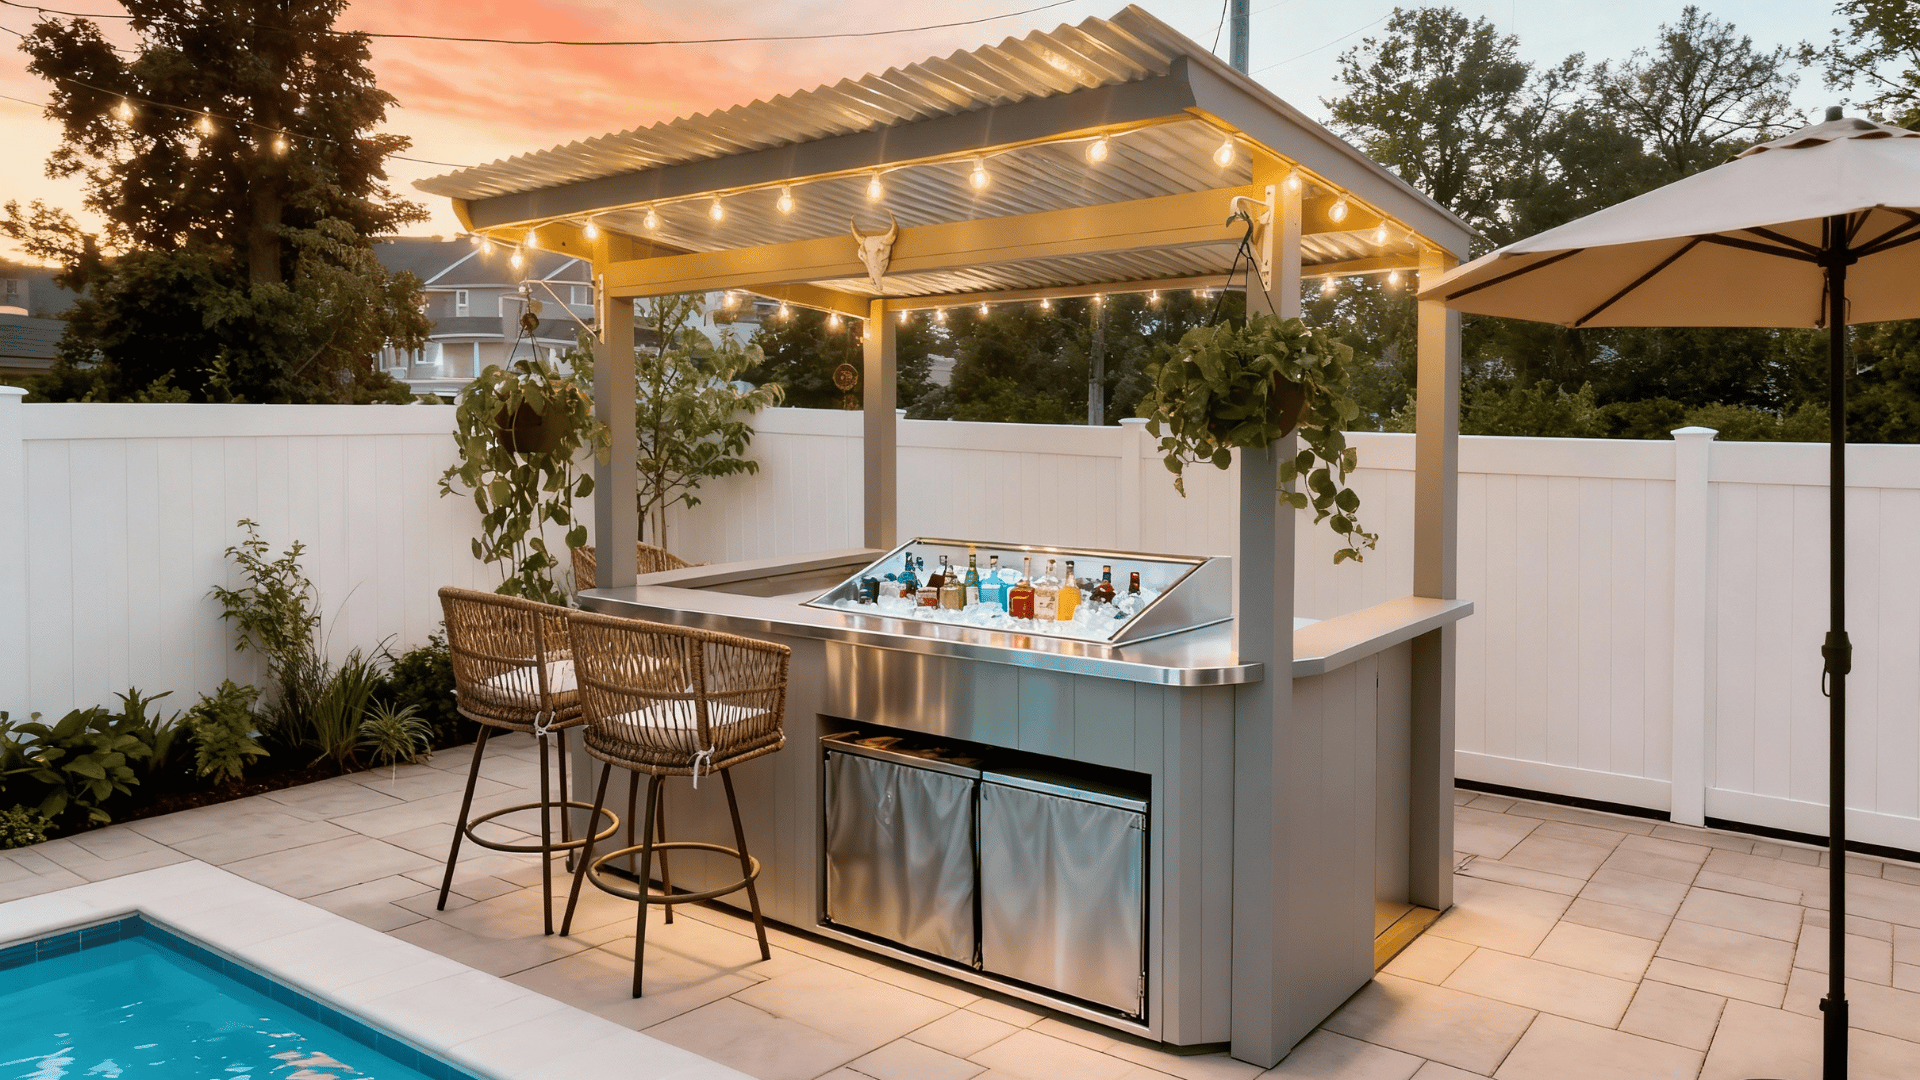
Exterior bars constructed from marine-grade polymer, stainless steel, or sealed wood withstand weather while facilitating poolside or patio entertaining.
Built-in ice bins keep beverages cold without indoor trips, while covered storage protects glassware and supplies from the elements. Umbrella holes provide shade during daytime use.
How to Achieve this Look:
- Use marine-grade polymer lumber or powder-coated aluminum framing that resists moisture, UV damage, and temperature extremes.
- Install built-in cooler inserts or ice bins with drainage systems to keep beverages chilled outdoors.
- Apply marine-grade sealant or outdoor polyurethane to all wood surfaces, reapplying annually for continued protection.
Common Mistakes to Avoid
Even the best DIY home bars can fall short without the right approach. Avoid these common mistakes to keep your setup functional, stylish, and long-lasting.
- Skipping Proper Planning: Not measuring your space or setting a budget often results in poor design and unnecessary expenses.
- Ignoring Storage Needs: Forgetting bottle, glassware, or tool storage makes your bar cluttered and inconvenient.
- Using the Wrong Materials: Non-waterproof or cheap materials can warp or stain from spills and humidity.
- Overcrowding the Space: Too many decorations or items make your bar look cramped instead of stylish.
- Neglecting Lighting: Insufficient lighting reduces both the bar’s visual appeal and practicality during use.
- Forgetting Ventilation and Electrical Safety: Poor airflow or unsafe wiring can cause overheating and safety issues.
- Skipping Regular Maintenance: Without cleaning and resealing, your bar will lose its shine and durability over time.
Conclusion
Building your own DIY bar is more than just a weekend project; it’s a way to create a space that feels truly yours.
You must focus on smart storage, good lighting, and regular maintenance to keep it looking fresh.
If you enjoy hosting friends or relaxing after a long day, your bar can become a favorite spot in your home.
So take your time, enjoy the process, and raise a glass to your finished DIY home bar, a perfect mix of function, comfort, and personal flair.