Creating accessible bathrooms isn’t just about meeting legal requirements; it’s about ensuring dignity and safety for everyone who uses your facility.
If you’re renovating an existing space or designing new construction, understanding ADA bathroom layout guidelines is essential for architects, contractors, and property managers.
The Americans with Disabilities Act sets forth specific standards that prioritize ease of use and safe transfers for individuals with mobility challenges.
We’ll walk you through the critical elements of ADA bathroom design based on practical principles.
Why ADA Bathroom Layout?
An ADA bathroom layout is essential because it ensures accessibility, safety, and inclusivity for people of all abilities.
The Americans with Disabilities Act (ADA) sets clear design standards so that individuals using wheelchairs, walkers, or with limited mobility can use restroom facilities comfortably.
Proper layout planning covering aspects like clear floor space, turning radius, fixture height, and grab bar placement, creates a functional environment that meets both legal requirements and human needs.
Beyond compliance, ADA bathroom design promotes universal usability, accommodating everyone from children to seniors without barriers.
In public and commercial spaces, it also reduces liability and enhances the overall user experience.
List of All ADA Toilet Requirements
These guidelines ensure proper space for wheelchair maneuvering, secure support, and easy-to-reach fixtures that promote independence and equal access in every restroom design.
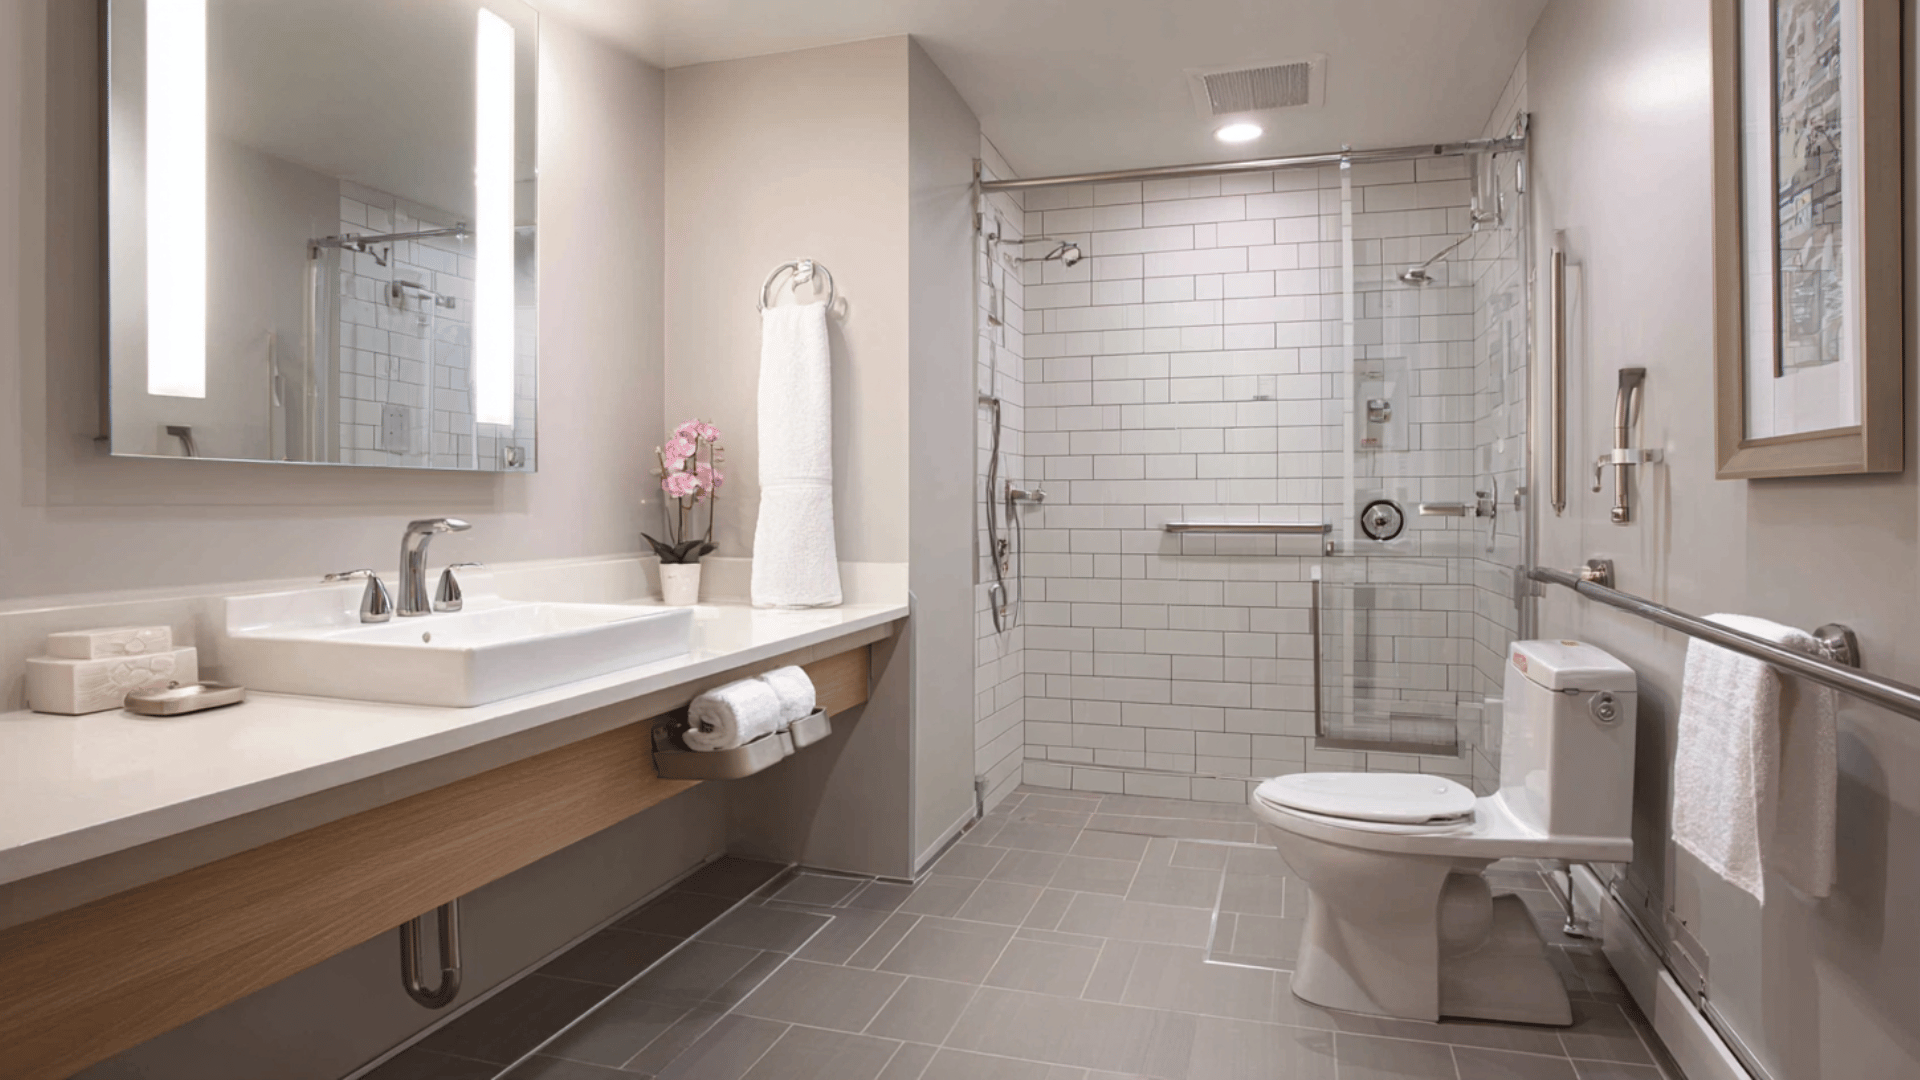
1. Toilet Placement and Clearance
ADA-compliant toilets require precise positioning to ensure wheelchair accessibility and safe transfers.
The toilet centerline must be positioned exactly 16-18 inches from the side wall or partition. The toilet seat height must be 17-19 inches above the finished floor.
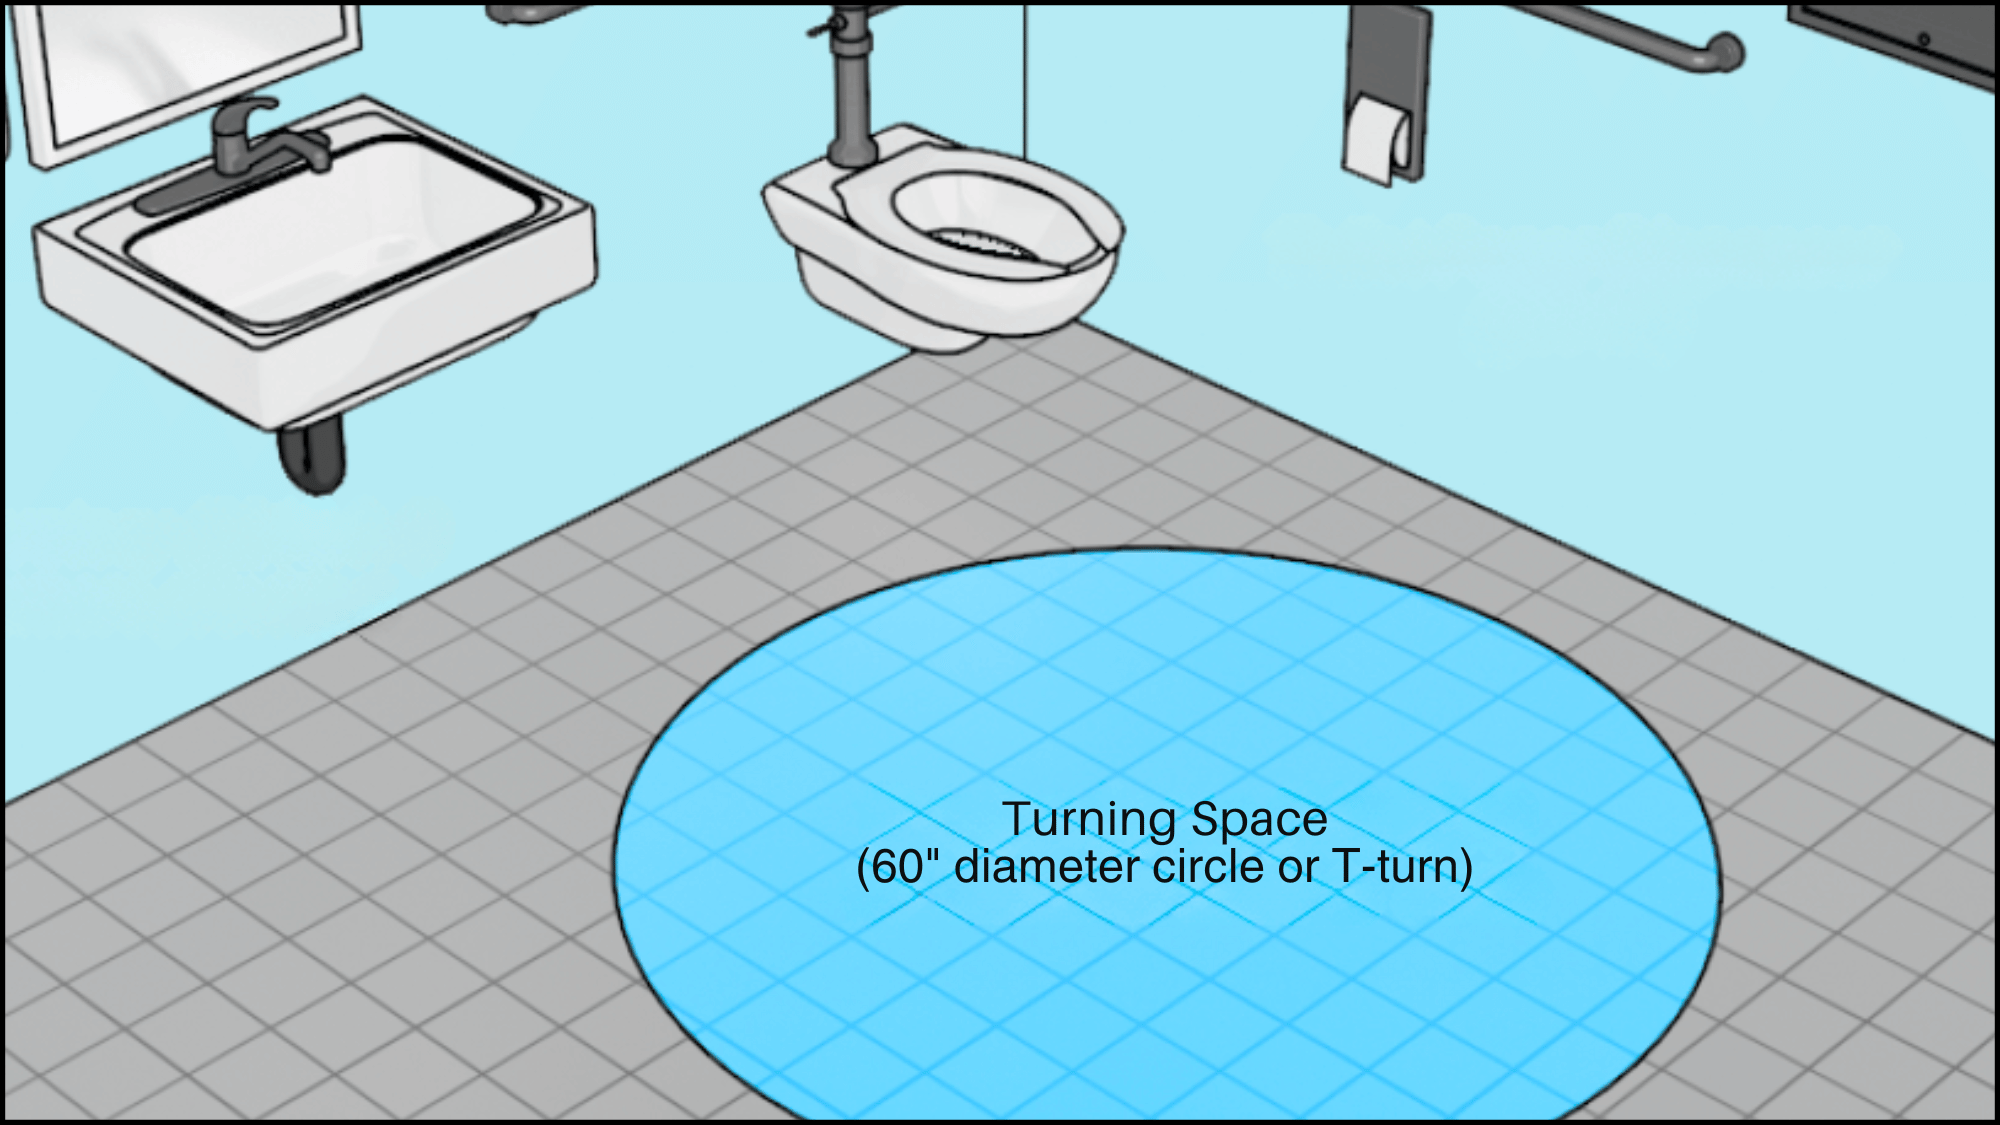
- Approach Space: Minimum 60-inch diameter turning space or T-shaped turning area must be provided within the toilet room for wheelchair rotation
- Toe Clearance: At least 9 inches of toe clearance height under fixtures and 6 inches depth to accommodate footrests on wheelchairs
- Door Swing: Doors cannot swing into the minimum required clear floor space unless the room exceeds the minimum dimensions by a sufficient margin.
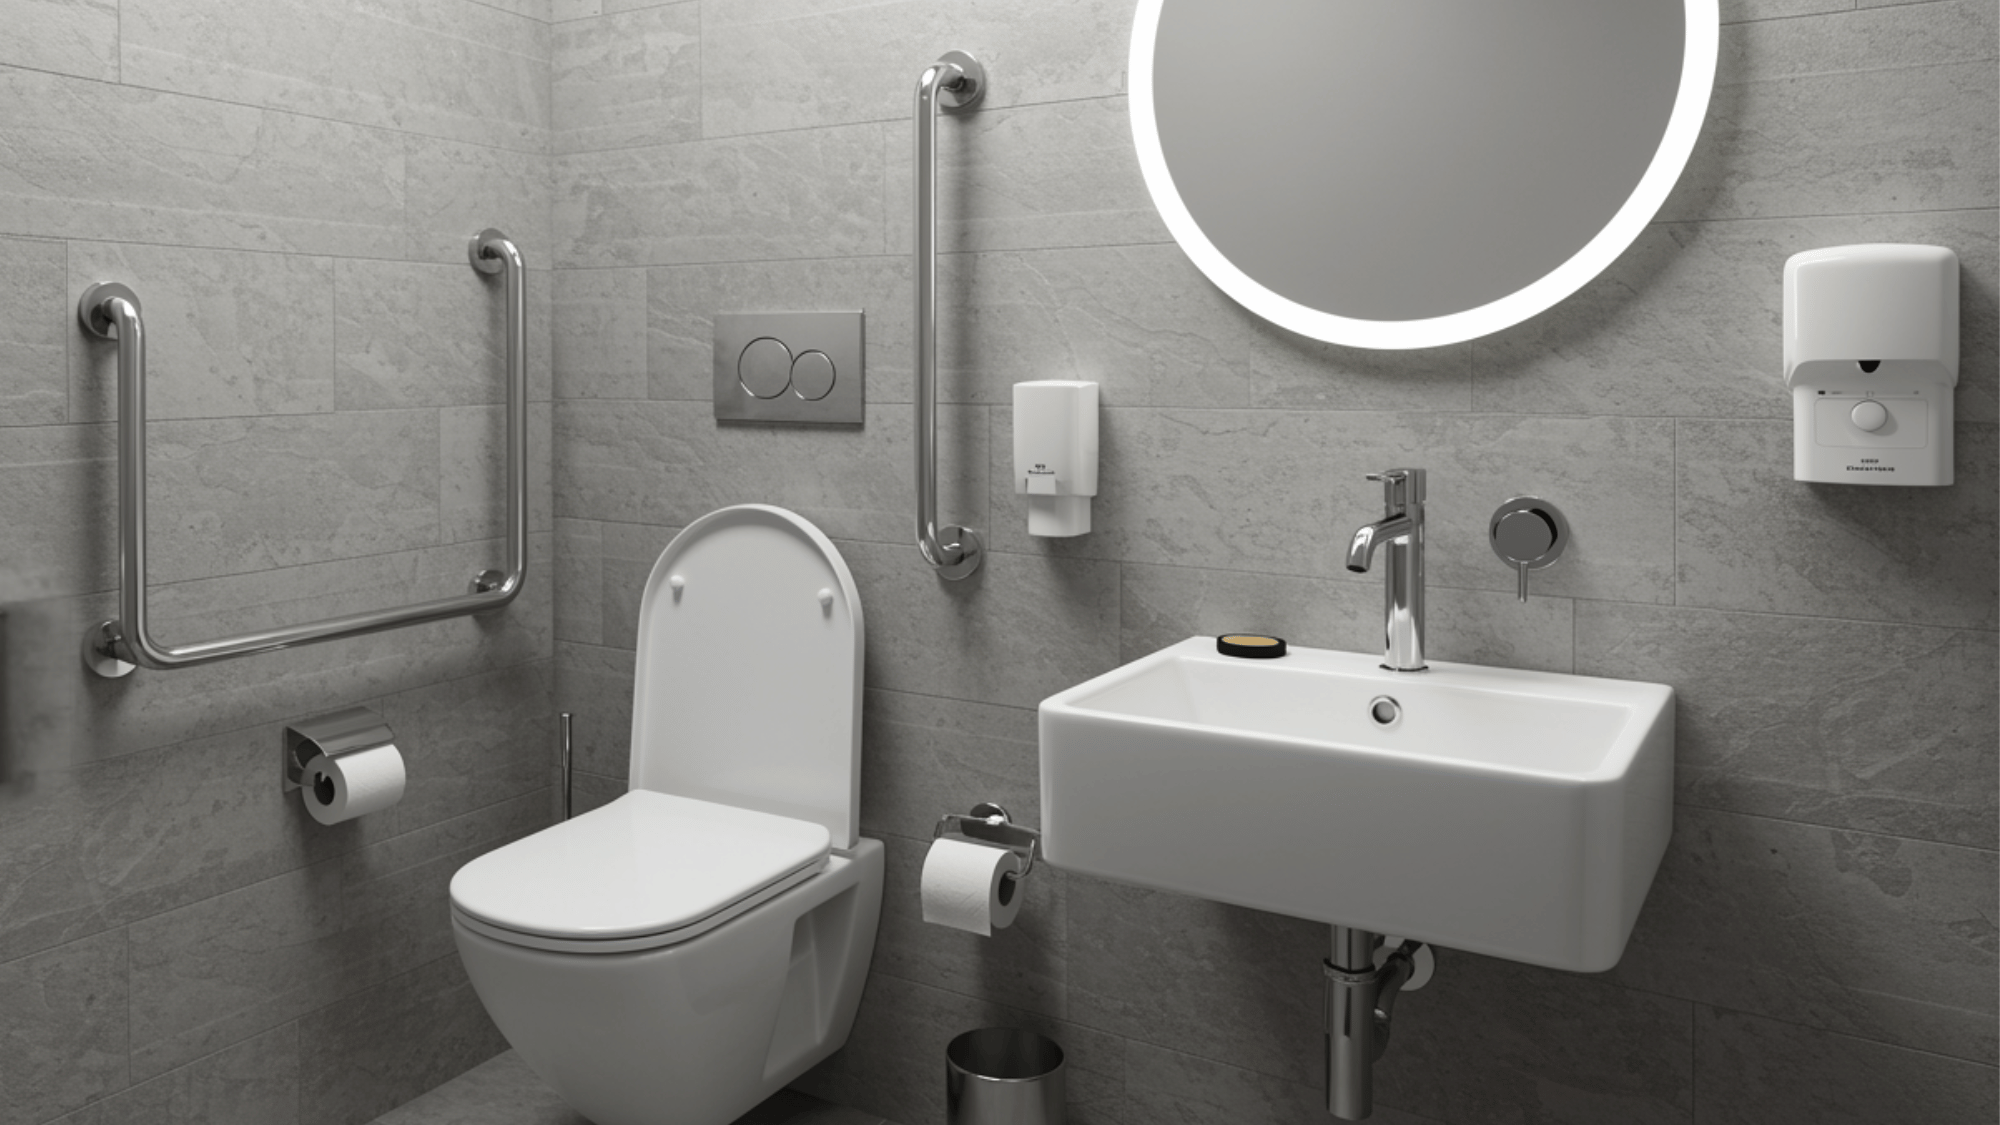
2. Grab Bar Specifications
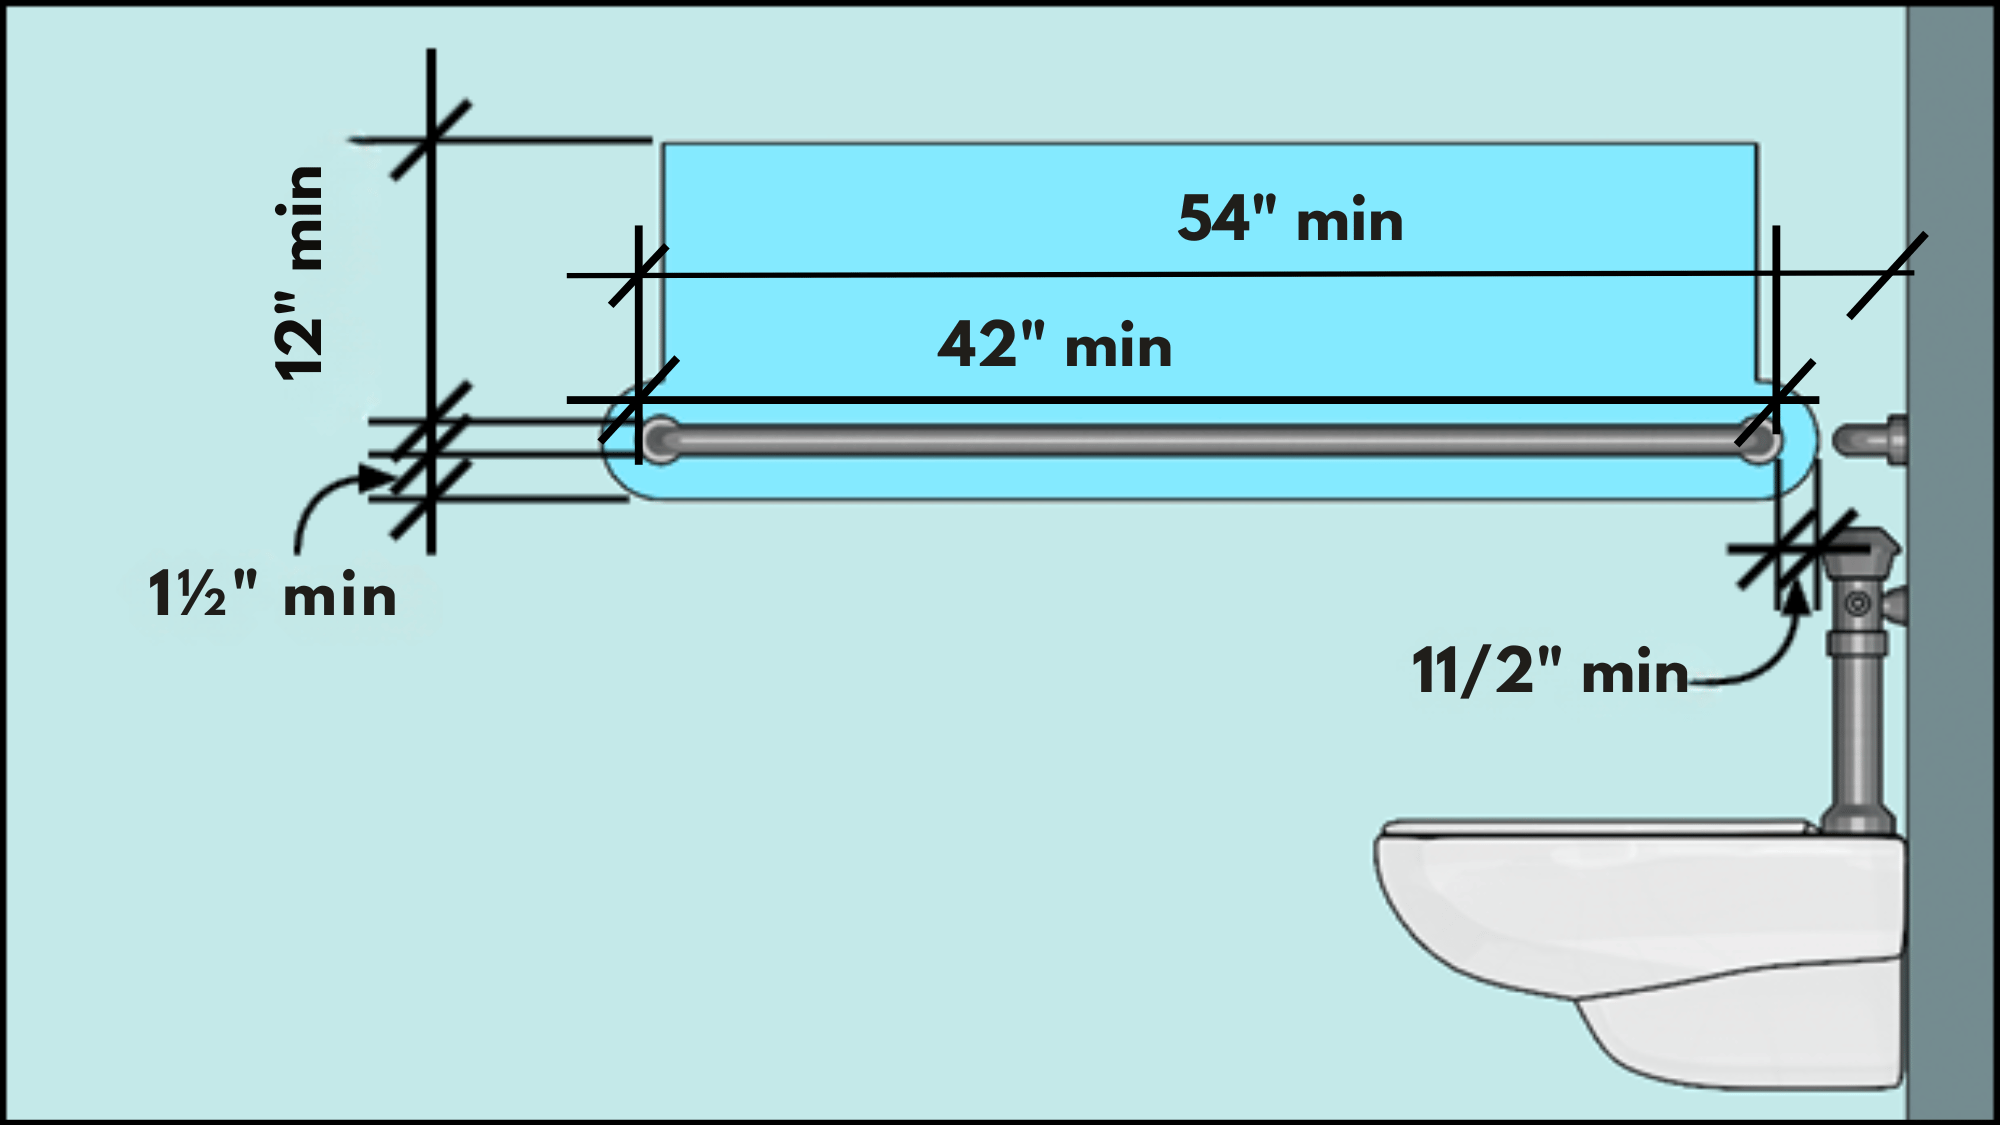
Grab bars provide essential support. Side wall grab bars must be at least 42 inches long, mounted no more than 12 inches from the rear wall, and extending at least 54 inches from the rear wall.
Rear wall grab bars must be at least 36 inches long, centered on the toilet. All grab bars mount 33-36 inches above the finished floor.
- Structural Support: Bars must withstand at least 250 pounds of force in any direction without permanent deformation or failure of mounting systems
- Diameter and Gripping: Circular bars require a 1.25-2 inch outer diameter with a 1.5 inch clear space between the bar and the wall for proper hand grip
- Surface Finish: Non-abrasive surfaces required with no sharp or abrasive elements that could cause injury during transfers or support activities.
3. Accessories and Controls
Toilet accessories and dispensers must be positioned within accessible reach ranges for seated users.
Flush controls can be located on the open side, top, or operated automatically. All controls must be operable with one hand using 5 pounds maximum force.
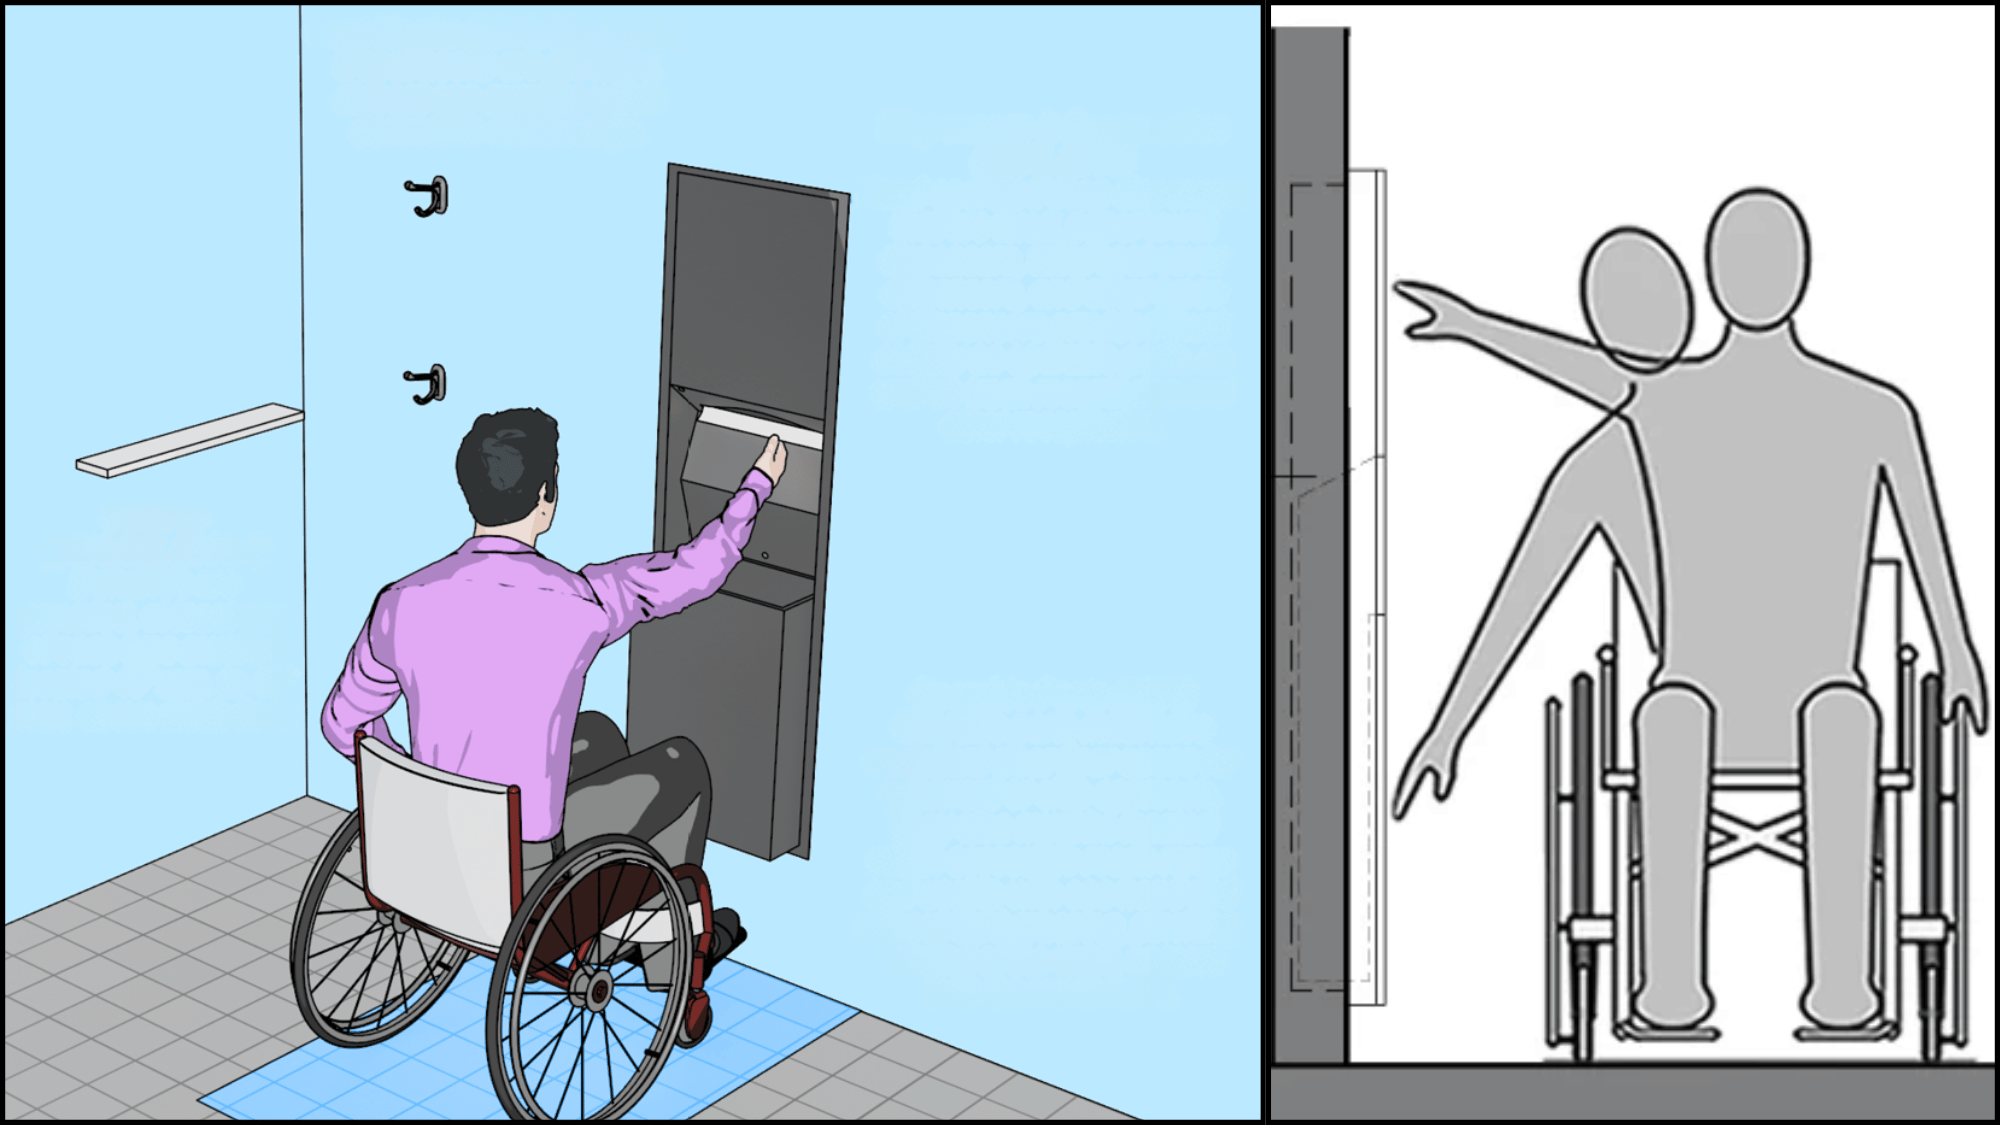
- Dispenser Location: Paper must dispense from below the grab bar, preventing interference with gripping surfaces while ensuring easy one-handed operation
- Coat Hooks and Shelves: Must be mounted at a maximum of 48 inches for forward reach or 54 inches for side reach from floor level
- Operating Mechanisms: Push-button, touchless sensors, or lever controls preferred over twist mechanisms requiring tight grasping, pinching, or wrist rotation
4. ADA Sink and Vanity Standards
When designing an ADA-compliant bathroom, the sink and vanity area must be thoughtfully structured to ensure accessibility, comfort, and safety for all users.
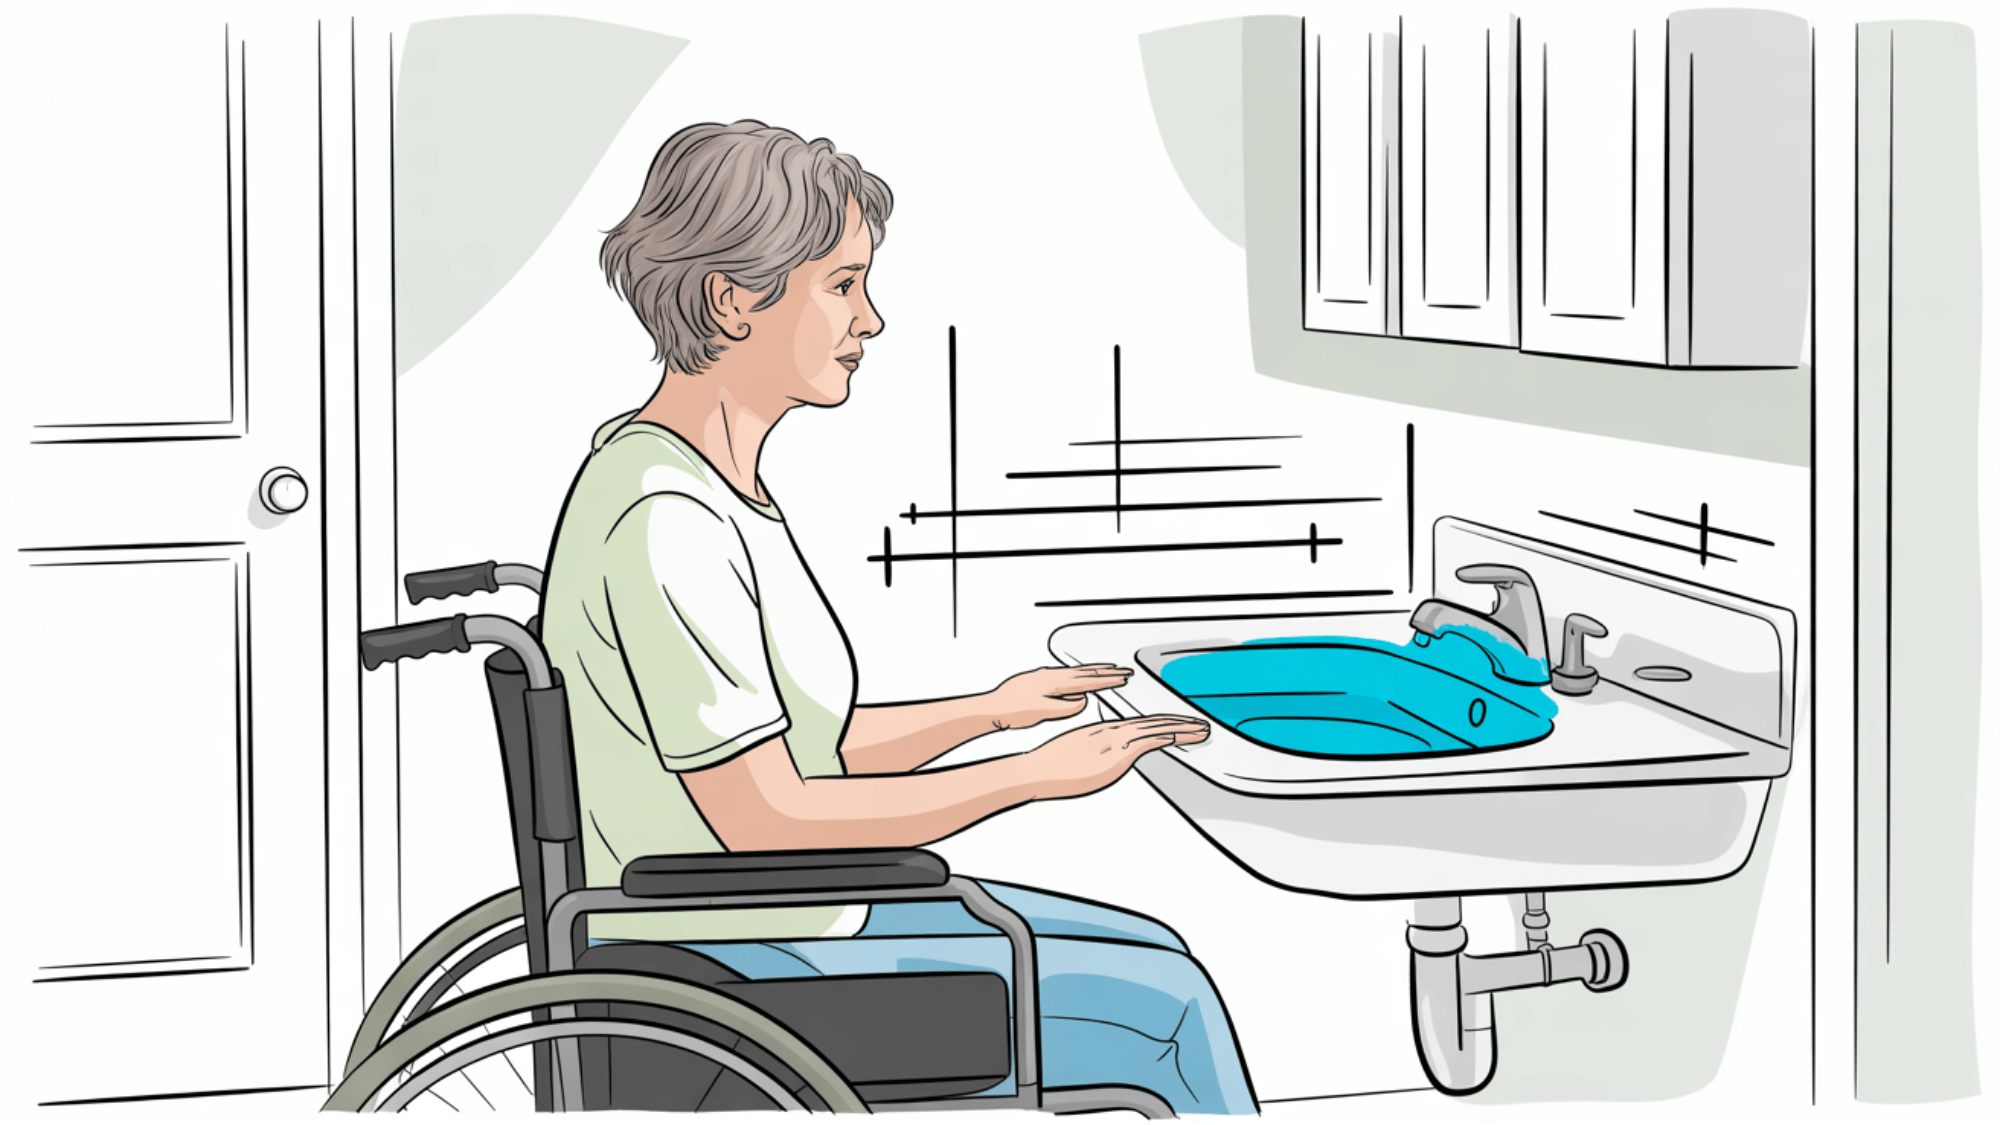
- Maximum Height: The sink or countertop rim must be no higher than 34 inches above the finished floor.
- Clear Floor Space: A minimum of 30 inches by 48 inches in front of the sink, allowing a forward wheelchair approach.
- Sink Depth: Should not reduce the required knee and toe clearance underneath.
5. ADA Shower and Bathtub Requirements
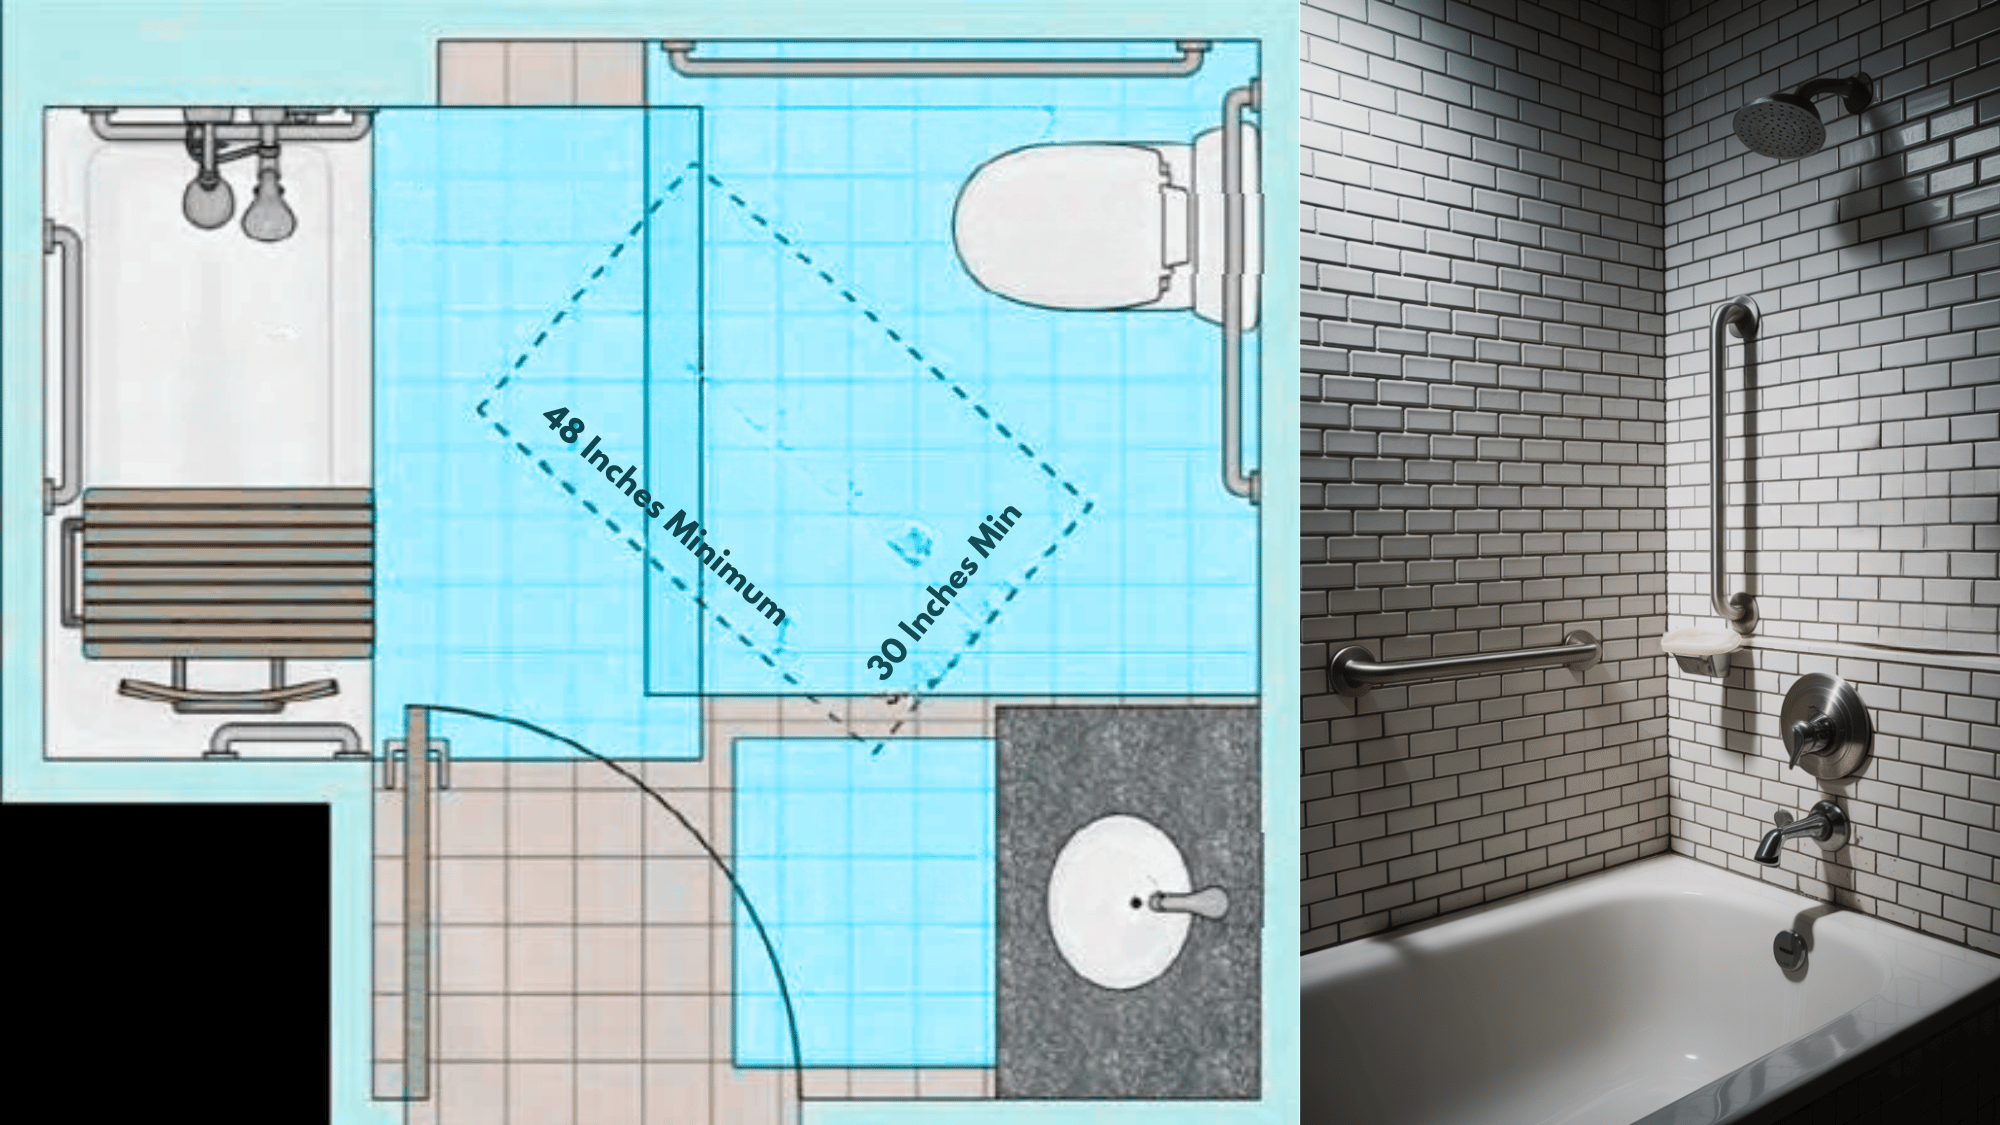
Accessible showers and bathtubs are essential components of ADA-compliant restrooms, designed to provide safe and independent bathing facilities for individuals with disabilities.
- Roll-In Shower: Roll-in showers must measure a minimum of 30 inches by 60 inches with absolutely no curb or threshold, allowing wheelchairs to roll directly inside.
- Transfer Shower: Transfer showers must be exactly 36 inches by 36 inches square with a maximum 0.5-inch beveled threshold.
- Bathtubs: ADA-compliant bathtubs require a clear floor space of 30 inches by 60 inches alongside the tub for a parallel approach.
To understand all the steps in a row, click here to download our free checklist of ADA Bathroom Requirements.
Extra Touches for Safety and Ease in ADA Bathroom Design
When designing an ADA-compliant bathroom, additional comfort and safety add-ons help elevate accessibility beyond the basic standards.
1. Non-Slip Flooring: Use slip-resistant tiles or textured flooring to prevent falls and ensure stability, especially in wet or shower areas.
2. Adjustable Fixtures: Height-adjustable mirrors, showerheads, and handheld sprays enhance comfort for users of varying heights and mobility levels.
3. Soft-Close Toilet Seats and Lids: Reduce noise and prevent accidental slamming, adding both comfort and safety for users with limited dexterity.
4. Temperature-Controlled Faucets: Thermostatic mixing valves help maintain safe water temperatures and prevent scalding.
5. Rounded Corners and Edges: Countertops, vanities, and shelves should have smooth edges to reduce the risk of injury during movement.
6. Seating and Support Aids: Portable benches, fold-down shower seats, or extra support rails provide added convenience for users needing stability.
7. Adequate Ventilation: Proper airflow and humidity control enhance comfort and prevent mold growth, maintaining a safe and hygienic environment.
Emergency and Convenience Features
In ADA-compliant bathrooms, emergency and convenience features play a crucial role in enhancing user safety, accessibility, and comfort.
| Feature | Key Requirement |
|---|---|
| Emergency Alarms | Must include audible and visual alerts (flashing lights and sounds) for users with hearing or visual impairments. |
| Call Systems | Pull cords or buttons 15–48″ high allow users to request help quickly during emergencies. |
| Door Hardware | Operable with one hand and releasable from outside without special tools. |
| Convenience Features | Coat hooks, shelves, and bins must be within reach and not block accessible floor space. |
| Lighting & Signage | Use bright, glare-free lighting with Braille or tactile signage for visibility and safe navigation. |
Common Design Mistakes to Avoid
Designing an ADA-compliant bathroom requires precision and awareness of specific standards. Even small errors can compromise accessibility and comfort. Here are key mistakes to avoid:
- Incorrect Fixture Heights: Installing sinks, toilets, or grab bars outside ADA-specified height ranges reduces accessibility. Always verify measurements against ADA 2010 guidelines.
- Insufficient Clear Floor Space: Failing to leave at least 60 60-inch turning radius restricts wheelchair movement and violates compliance standards.
- Improper Grab Bar Placement: Grab bars placed too high, too low, or too far from fixtures reduce user safety and support.
- Door Swing Interference: Doors that open into clearance zones block wheelchair access. Opt for outward-swinging or sliding doors.
- Obstructed Reach Ranges: Items like soap dispensers, mirrors, or hand dryers placed above 48 inches or below 15 inches are difficult to access.
- Ignoring Slip Resistance: Overlooking slip-resistant flooring increases accident risks, especially in wet zones.
Conclusion
From precise toilet placement and grab bar positioning to accessible shower configurations and proper clearances, each requirement plays a vital role in ensuring safety and usability.
While these standards may initially seem technical, they’re rooted in real-world needs and practical accessibility principles that benefit everyone, not just individuals with disabilities.
Remember that ADA compliance isn’t a one-time checkbox; it’s an ongoing commitment to inclusive design.
Start planning your accessible bathroom renovation today!